

Before you assume your saw’s clamp mechanism is broken, there’s a real chance the actual problem is the blade, not the tool. This is the part almost every generic troubleshooting guide skips: blade brands don’t all fit the same across different saws, and a blade that pops loose in one saw can seat rock-solid in the exact same saw once you switch brands. Here’s how to actually tell which one is the issue, and what to do about each.
Is It the Blade or the Saw? A Simple Test
Before doing anything else, try a different blade, ideally a different brand, in the same saw. If the new blade seats securely and locks in tight while the old one still won’t stay put, the problem is almost certainly the blade’s shank hole, not your saw’s clamp mechanism. This single test cuts the troubleshooting list roughly in half and tells you which section below actually applies to you.
Blade-Side Causes
Shank Hole Tolerance Mismatch Between Brands
This is the cause most guides never mention, and it’s a genuinely common one. The hole in a reciprocating saw blade’s shank has to match your saw’s locking pin closely enough to seat securely, and manufacturing tolerances on that hole vary meaningfully by brand. A hole that’s very slightly oversized or undersized for your specific saw’s pin won’t lock reliably, even though nothing is actually wrong with either the blade or the saw individually, they just don’t fit each other well. This shows up consistently in real-world reports: name-brand blades (Milwaukee, Lenox) seat securely in saws where budget or off-brand blades pop right back out, in the identical tool. If you’ve only ever used one blade brand and you’re having this problem, trying a different brand is a genuinely useful diagnostic step, not just a shot in the dark.
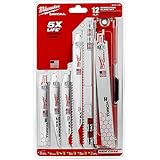
- Job site durable storage case adjusts to hold up to 9" blades.
- Thicker blade stock for maximum durability.
- Wood cutting blades feature a full raker tooth on blade tip for easy plunging.
- Includes: (2) 6" 5 TPI Blade, (2) 6" 8 TPI Blade, (4) 6" 18 TPI Blade, (2) 9" 5 TPI Blade, (2) 9" 14 TPI Blade
- Double relief angle reduces tooth stress for long life.
A set like Milwaukee’s 12-piece bi-metal blade pack is a reasonable way to test this without committing to a full box of a single blade type, if the problem disappears once you switch brands, you’ve found your answer.
Excess Paint or Coating in the Retaining Hole
A specific, fixable cause worth checking directly: some blades, certain Irwin models have been flagged for this repeatedly, ship with enough paint or coating buildup in the shank’s retaining hole that it doesn’t fully clear the locking pin. If you can see paint bridging or filling part of the hole, running a slightly oversized drill bit through it cleans this up in under a minute and often solves the problem immediately.
Bent or Twisted Blade
A blade that’s been bent or twisted, even slightly, from binding in a previous cut or from being dropped, may not seat flush in the clamp anymore even though the shank hole itself is fine. Sight down the blade’s length; visible waviness or a twist is enough to prevent a secure seat.
Blade Not Fully Seated
The basic check, but worth stating plainly: push the blade in until you feel or hear it click into place, then give it a firm tug before starting the saw. If it comes loose under a light tug, it was never actually locked in the first place.
Saw-Side Causes
Worn or Defective Locking Pin
The pin that engages the blade’s shank hole should be bullet-shaped. A pin that’s worn flat on the end, or was manufactured with a flat end instead of the correct bullet profile, won’t engage the shank hole securely regardless of which blade you use. This is a genuine defect, not a maintenance issue, and it’s worth checking the pin’s shape directly against a photo of a correct one for your saw’s model if blades are consistently loose across multiple brands.
Jammed Ball-Lock Mechanism
Many tool-less clamp systems use a spring-loaded ball or detent to hold the pin engaged. Dirt, sawdust, and metal shavings can work into this mechanism over time and prevent it from seating fully. A shot of a penetrating lubricant into the clamp mechanism, followed by working the lever through several full cycles, often frees this up without needing to open the tool.
Dirty or Rusted Arbor
The arbor is the part of the saw that actually holds the blade. Built-up dirt or surface rust here can prevent the blade shank from seating flush even when the clamp mechanism itself is working correctly. Wipe it down after use and check it periodically for buildup or corrosion.
Worn Internal Locking Mechanism
On some saws, the internal spring and pin assembly that drives the clamp mechanism itself wears out or shifts out of position over time, this is a legitimate, repairable failure distinct from a simple dirty clamp. It typically shows up as a blade that won’t stay locked no matter which blade you try, including blades that work fine in other saws. This is genuinely a tool-side mechanical issue rather than a blade compatibility problem.
Quick Fixes to Try First
- Swap to a different blade brand and retest, this alone resolves a large share of these cases.
- Wipe down and inspect the arbor and locking pin for dirt, rust, or visible wear.
- Check the blade’s retaining hole for paint or coating buildup; clear it with an oversized drill bit if needed.
- Tug-test every blade after installation, before starting the saw, as a standing habit.
When It’s a Real Repair
A worn or defective locking pin, or a failed internal spring mechanism, is a legitimate repair, not something cleaning or a blade swap will fix. On many cordless saws, this is a genuinely accessible DIY repair, the locking mechanism is often just a few screws away from the tool’s exterior, and replacement pins are inexpensive. On an older or lower-value saw, weigh the repair cost against simply replacing the tool, particularly if you’re also due for other upgrades on the platform.

Frequently Asked Questions
Why does my blade only fall out with certain brands?
This points directly at a shank hole tolerance mismatch between that blade brand and your specific saw’s locking pin. It’s a real, documented compatibility issue, not a sign that either the blade or the saw is defective on its own. Switching brands is the practical fix.
Is a loose blade dangerous?
Yes, genuinely. A blade that comes loose mid-cut can bind in the material, snap, or eject from the saw entirely, and any of those can happen with the saw still running. Always tug-test a newly installed blade before starting the cut, and stop immediately if a blade feels at all loose during use rather than continuing and hoping it holds.
Can I fix a bent locking pin myself?
If the pin is simply dirty or has debris jammed around it, yes, cleaning and lubricating it is a reasonable DIY fix. If the pin itself is worn flat or physically deformed, replacement is usually needed rather than a repair, and depending on your saw’s accessibility, that’s often still a DIY-friendly job with an inexpensive replacement part.
Do all reciprocating saws use the same blade shank size?
Most modern reciprocating saws use a standardized universal shank design, which is why cross-brand blades generally physically fit at all. Standardized doesn’t mean identical, though, manufacturing tolerances still vary enough between blade brands to cause the fit issues covered in this guide, even within blades that are nominally the same “universal” shank size.
Bottom Line
Test with a different blade brand before assuming your saw is broken, that one step resolves more of these cases than any cleaning or repair step will. If the problem follows the blade (fixed by switching brands or clearing debris from the hole), it was never a saw issue. If it persists across multiple blade brands, you’re looking at a genuine tool-side repair, most likely a worn locking pin or a failing internal clamp mechanism. If diagnosis points to a saw that’s simply worn out, our guide to the best reciprocating saws covers what to look for in a replacement.


