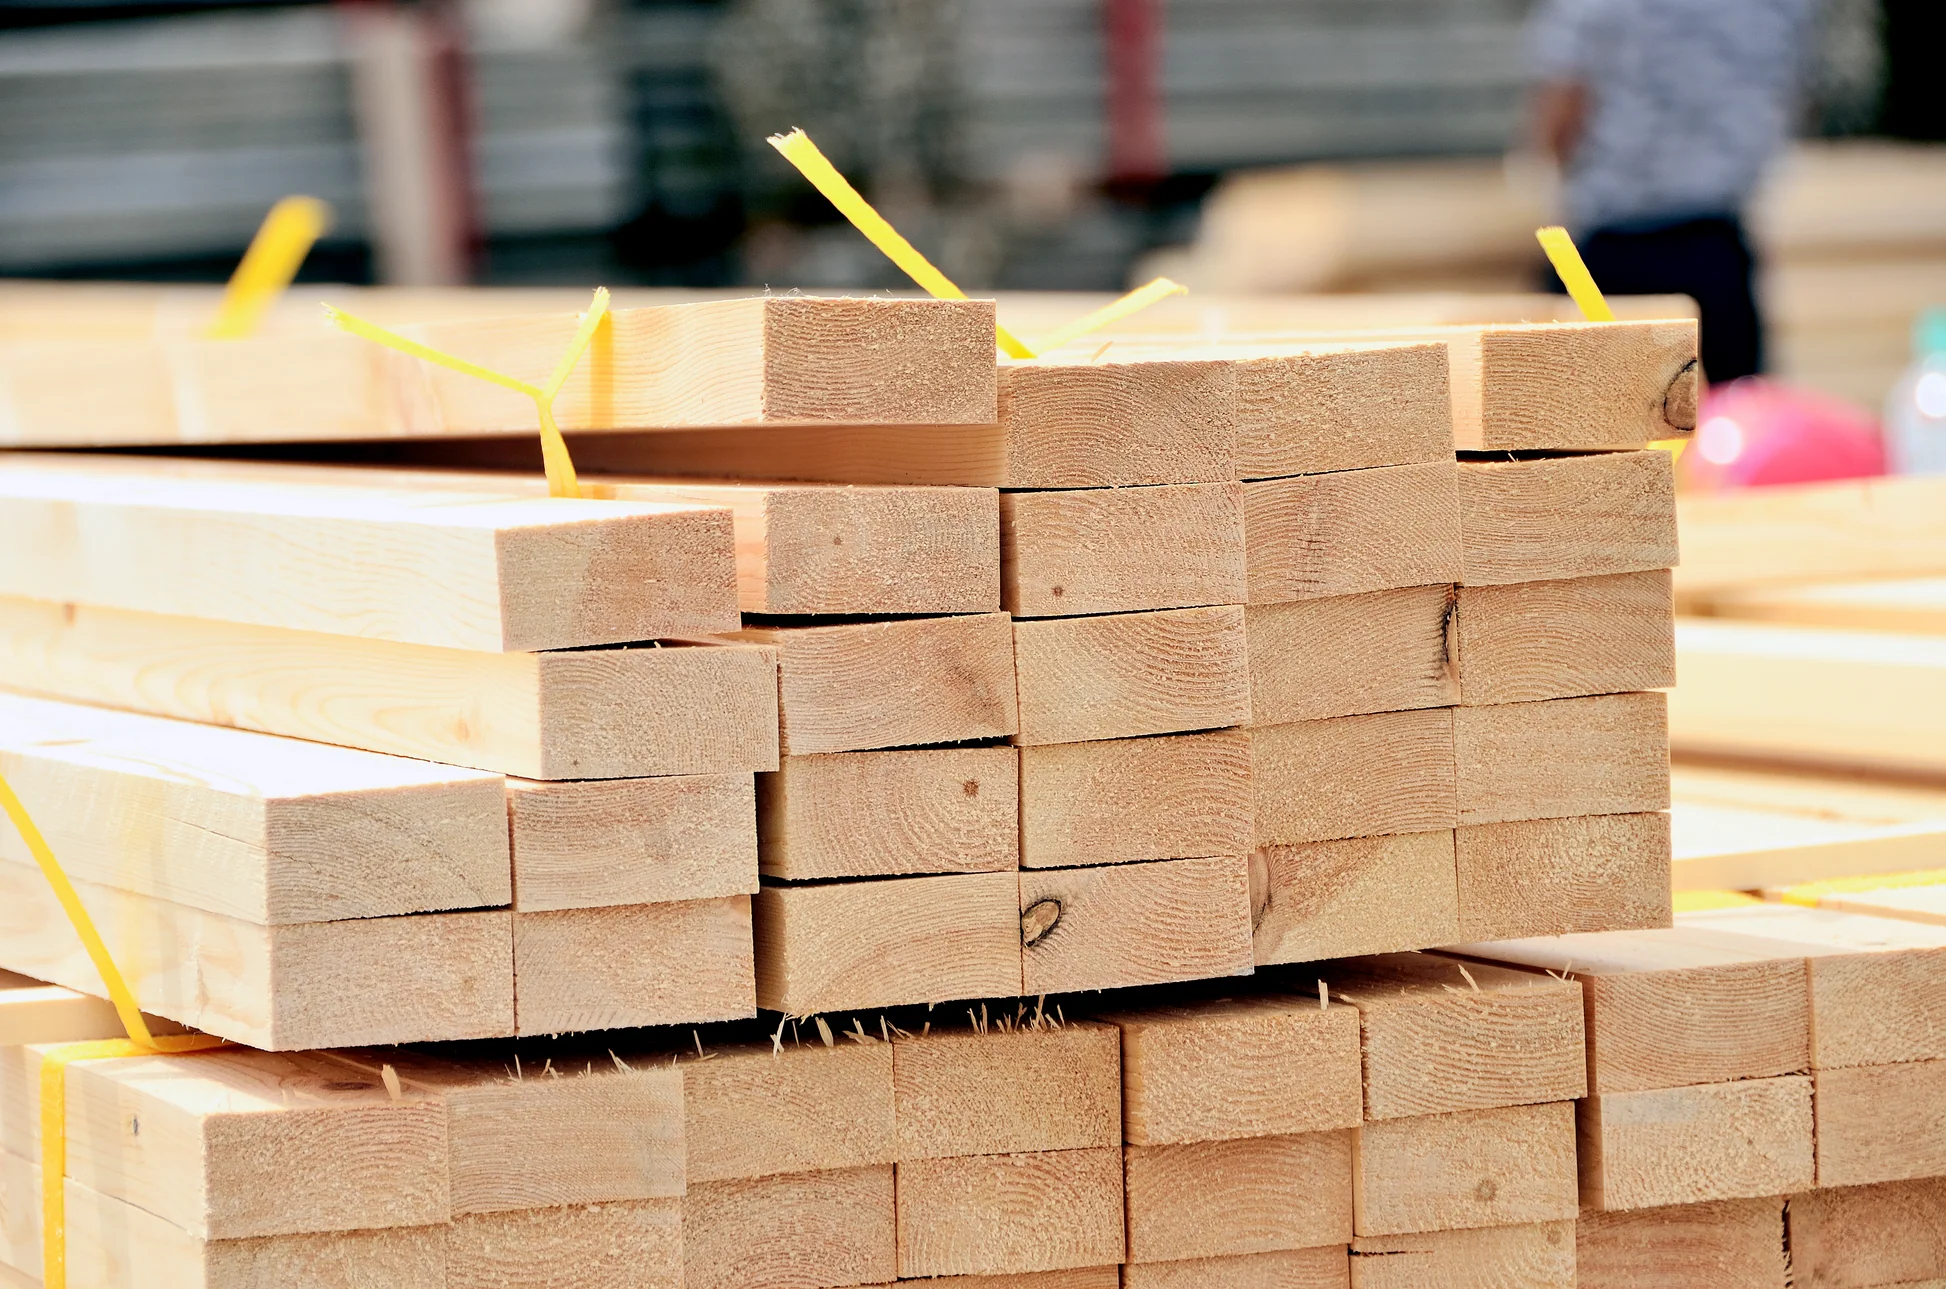
When you grab a 2×4 from the lumber yard, you might be surprised to learn it’s not actually 2 inches by 4 inches. This seemingly simple piece of wood has a fascinating story behind its measurements — and understanding its true dimensions is essential for any successful building or DIY project.
| Key Point | Details |
|---|---|
| Actual Size | 1.5″ × 3.5″ |
| Nominal Size | 2″ × 4″ (name only) |
| Standard Lengths | 8′, 10′, 12′, 16′, 20′ |
| Moisture Content | 19% or less (dried) |
| Dimensional Tolerance | ±1/16″ |
| Grade Markings | Stamped on every board |
| Common Uses | Wall framing, construction, DIY projects |
The Real Dimensions of a 2×4 📏
A standard 2×4 actually measures 1.5 inches wide by 3.5 inches tall. The “2×4” name is the nominal size — a label that dates back to when lumber was sold rough-cut at true dimensions. Today, every board you buy at Home Depot, Lowe’s, or any lumber yard will be 1.5″ × 3.5″ regardless of brand or supplier.
Why Is a 2×4 Not Actually 2×4?
- Raw logs are initially rough-cut to approximately 2″ × 4″
- The drying (kiln or air) process causes natural shrinkage of about 1/4″
- Planing smooths all four faces and removes additional material
- The result — 1.5″ × 3.5″ — has been the industry standard since the 1960s
This is not a scam or a short-change. Every lumber size follows the same nominal-to-actual convention, and building codes, blueprints, and construction plans are all written around these actual dimensions.
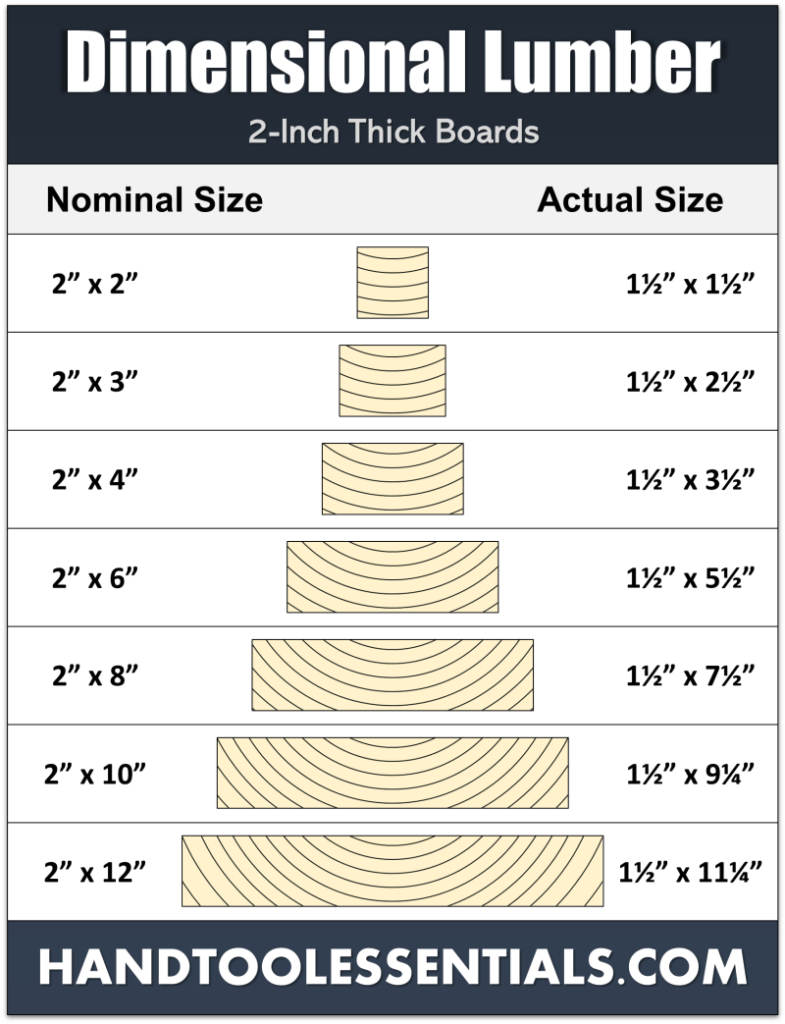
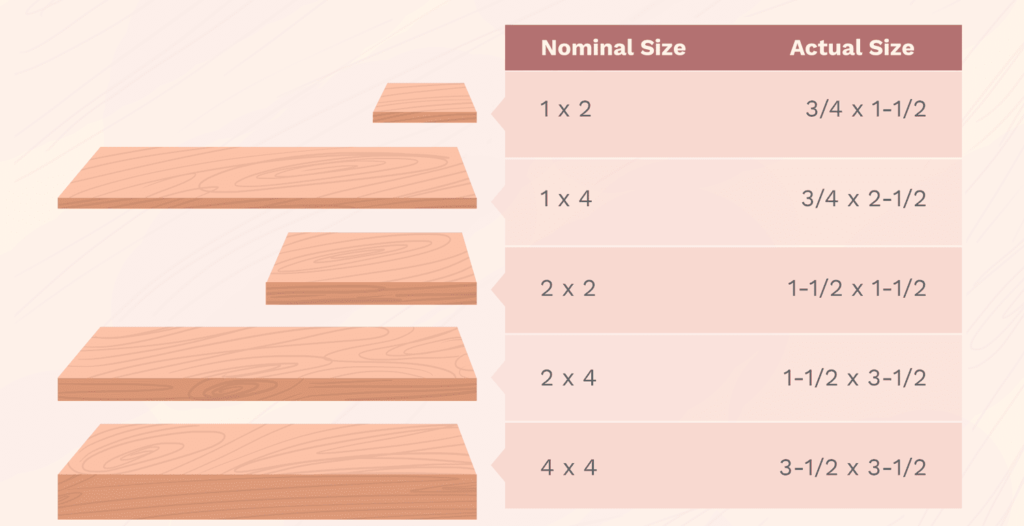
Actual vs. Nominal Size — Full Dimensional Lumber Chart
Understanding the 2×4 helps you decode the entire dimensional lumber system. Here are the most common sizes you’ll encounter at any lumber yard:
| Nominal Size | Actual Size (inches) | Actual Size (mm) | Common Use |
|---|---|---|---|
| 1×2 | 0.75″ × 1.5″ | 19 × 38 mm | Trim, furring strips |
| 1×4 | 0.75″ × 3.5″ | 19 × 89 mm | Shelving, paneling |
| 1×6 | 0.75″ × 5.5″ | 19 × 140 mm | Fascia, decking boards |
| 2×4 | 1.5″ × 3.5″ | 38 × 89 mm | Wall framing, studs |
| 2×6 | 1.5″ × 5.5″ | 38 × 140 mm | Floor joists, exterior walls |
| 2×8 | 1.5″ × 7.25″ | 38 × 184 mm | Headers, beams |
| 2×10 | 1.5″ × 9.25″ | 38 × 235 mm | Roof rafters, floor joists |
| 2×12 | 1.5″ × 11.25″ | 38 × 286 mm | Stair stringers, large beams |
| 4×4 | 3.5″ × 3.5″ | 89 × 89 mm | Posts, fence posts |
| 6×6 | 5.5″ × 5.5″ | 140 × 140 mm | Structural posts, pergolas |
Historical Context — Why the Name Stuck
The story of 2×4 dimensions traces back to early American sawmills in the 1800s. Originally, rough-cut lumber was sold at its true sawn size — an actual 2 inches by 4 inches. As milling technology advanced and kiln drying became standard, the finished size shrank but the name never changed.
Evolution Timeline
- Pre-1920s: Rough-cut lumber sold at true dimensions (2″ × 4″)
- 1920s–1930s: Planing became common practice; sizes began to shrink
- 1960s: The American Lumber Standard was established, fixing current dimensions
- 1970s–Present: Universal sizing adopted across the US and Canada
The nominal naming convention persists today purely for tradition and trade convenience. Every professional carpenter, contractor, and building inspector understands that a “2×4″ means 1.5″ × 3.5”.
The Manufacturing Process 🏭
Modern lumber production follows a precise sequence that directly explains the final 1.5″ × 3.5″ dimensions:
| Process Stage | Approximate Size | What Happens |
|---|---|---|
| Log breakdown (rough cut) | ~2.25″ × 4.25″ | Sawmill cuts log into boards slightly oversized |
| Green lumber (rough) | 2″ × 4″ | Trimmed to nominal size before drying |
| Kiln or air drying | ~1.75″ × 3.75″ | Moisture loss causes natural shrinkage |
| Planing (4 sides) | 1.5″ × 3.5″ | Surfacing removes ~1/8″ per side, creates smooth face |
| Final graded product | 1.5″ × 3.5″ | Stamped, graded, and ready for sale |
Understanding Grade Stamps on 2×4 Lumber
Every 2×4 sold at a lumber yard carries a grade stamp — a small ink mark that tells you everything about the board’s quality and origin. Knowing how to read it saves you from buying weak lumber for structural projects.
What the Grade Stamp Tells You
- Mill number: Identifies which mill produced the board
- Grade: Select Structural, No. 1, No. 2, No. 3, or Stud grade
- Species: SPF (Spruce-Pine-Fir), HF (Hem-Fir), DF (Douglas Fir), etc.
- Moisture content: “S-DRY” = 19% or less; “S-GRN” = green (unseasoned)
- Grading agency: NLGA, WWPA, SPIB, or similar certification body
Which Grade Should You Buy?
- Select Structural / No. 1: Best quality — use for load-bearing walls, beams, headers
- No. 2: Most common — good for standard wall framing and general construction
- No. 3 / Economy: More knots and defects — acceptable for temporary work, bracing, blocking
- Stud grade: Specifically designed for vertical wall studs — not for horizontal use
Practical Applications in Construction 🏠
When planning any project, always use actual dimensions (1.5″ × 3.5″), never nominal. This is especially critical when:
Where Actual Size Matters Most
- Wall framing: A standard 2×4 wall with drywall on each side is 4.5″ thick total — important for window and door rough openings
- Stud spacing: 16″ or 24″ on center — measured from the center of one stud to the center of the next
- Door and window headers: Stack two 2×4s on edge (3.5″ × 3″) or use 2×6/2×8 depending on span
- Floor-to-ceiling height: Account for the actual thickness of plates (top and bottom = 3 boards × 1.5″ = 4.5″) when calculating wall stud lengths
- Material quantities: Divide your linear footage by the actual board length to calculate how many pieces to buy
Quick Formula — How Many 2×4s Do You Need?
For a standard 8-foot wall with studs 16″ on center:
- Divide wall length (in inches) by 16, then add 1 for the end stud
- Example: 12-foot wall = 144″ ÷ 16 = 9 + 1 = 10 studs
- Always add 10–15% waste factor for cuts, splits, and mistakes
For precise cutting and measuring, use a quality laser distance meter or a precision tool set to guarantee accuracy.
Best Tools for Cutting and Measuring 2×4 Lumber 🛠️
Having the right tools makes working with dimensional lumber significantly faster, safer, and more accurate. Here are the tool categories every builder and DIYer should have:
Measuring Tools
- Laser distance measurer — for fast, accurate room and wall measurements
- Layout tools — speed square, combination square for marking cut lines
- Quality tape measure — at least 25-foot length for framing work
Cutting Tools
- Miter saw (chop saw): Best tool for making fast, accurate cross cuts on 2×4s — ideal for framing
- Circular saw: Portable option for cutting on-site; pair with a quality framing blade (24-tooth for fast cuts)
- Jigsaw: For curved cuts and notching around obstacles — see our best jigsaw blades guide
Fastening Tools
- Cordless drill/driver: Essential for driving screws into 2×4 framing
- Cordless impact driver: Faster and more powerful than a drill for structural screws — see our cordless impact guide
- Framing nailer: For high-volume framing work — dramatically faster than hand nailing
Quality and Selection — How to Pick the Best Boards 🔍
Not all 2×4s at the lumber yard are equal. Always inspect boards individually before loading them into your cart.
What to Look For
- Straightness: Sight down the length of the board — it should be arrow-straight with no bow, cup, or twist
- Knots: Small, tight knots are acceptable for most framing; avoid large, loose, or dead knots in structural lumber
- Moisture: Green or wet lumber will shrink and warp after installation — look for “S-DRY” stamp or buy kiln-dried (KD)
- Checks and splits: Small surface checks at the ends are normal; avoid boards with splits running deep into the wood
- Color consistency: Blue or black staining indicates mold from improper storage — avoid these boards
Common Defects to Reject
- Bow: The board curves along its length (like a banana) — unusable for flat framing
- Cup: The face curves across the width — causes gaps when nailed flat
- Twist: The board spirals along its length — impossible to frame straight walls with
- Wane: Bark or missing wood on the edge — weak structural integrity
Storage and Handling 🏗️
Proper storage before and after purchase prevents costly warping and maintains the 1.5″ × 3.5″ dimensional stability you need.
Storage Best Practices
- Keep it dry: Cover with tarps or store indoors — moisture is the #1 cause of warping
- Stack flat and level: Use a level surface; stacking on uneven ground causes permanent bowing
- Use stickers: Place thin wood strips (stickers) between each layer to allow air circulation and prevent moisture buildup
- Elevate off the ground: Never store lumber directly on concrete or dirt — moisture wicks up from below
- Acclimate before use: If bringing lumber indoors (for interior framing), let it sit in the space for 48–72 hours to adjust to ambient humidity
Problem-Solving Guide — Common 2×4 Issues
Troubleshooting Tips
- Board is warped after purchase: Check moisture content — “S-GRN” (green) lumber warps as it dries; always buy S-DRY or KD for finish work
- Size varies between boards: Always measure each board — even within a bundle, slight variations of ±1/16″ are within industry tolerance
- Board splits when nailing near the end: Pre-drill pilot holes within 2–3 inches of board ends to prevent splitting
- Rough or splintery surface: A light pass with 80-grit sandpaper and a cordless sander cleans it up quickly
- Board won’t lie flat after installation: It was likely still green when installed — let it dry in place; it will stabilize within a few weeks
Project Planning Checklist
Before starting any project with 2×4 lumber, work through this checklist:
Pre-Project Checklist
- ✅ Calculate using actual dimensions (1.5″ × 3.5″), never nominal
- ✅ Add a 10–15% waste factor to your material list
- ✅ Confirm the correct lumber grade for your application (structural vs. non-structural)
- ✅ Check moisture content — buy kiln-dried (KD) or S-DRY for interior work
- ✅ Inspect every board for straight grain and no twist before purchasing
- ✅ Confirm fastener spacing requirements for your specific application (check local building code)
- ✅ Account for expansion gaps if working in high-humidity environments
Industry Standards
The dimensional lumber system in the US is governed by the American Lumber Standard (ALS), administered through the American Lumber Standard Committee (ALSC). Canadian lumber follows the National Lumber Grades Authority (NLGA) standard, which is harmonized with the US system.
Standard Requirements
- Maximum moisture content: 19% for S-DRY; 15% or less for KD-15 stamped lumber
- Dimensional tolerance: ±1/16″ on width and thickness
- Grade marking: Required on every piece of structural lumber
- Treatment labeling: Pressure-treated lumber must display treatment type, retention level, and approved use (e.g., “Ground Contact” or “Above Ground”)
- Species identification: Must be identifiable from the grade stamp for structural calculations
Pressure-Treated 2×4 — When and Why to Use It
Standard 2×4 lumber is not suitable for all applications. Pressure-treated (PT) 2×4s are chemically preserved to resist moisture, rot, and insects — and are required by code in certain situations.
Use Pressure-Treated 2×4s When:
- Building decks, fences, or any outdoor structure
- Framing walls in contact with concrete (basement walls, garage slab)
- Installing a bottom plate (sole plate) directly on a concrete floor
- Building raised garden beds or planters
- Any application within 6 inches of the ground
Important: Pressure-treated lumber has the same actual dimensions (1.5″ × 3.5″) as standard lumber but is typically heavier due to retained moisture from the treatment process. Always use hot-dipped galvanized or stainless steel fasteners with PT lumber — standard zinc-coated fasteners will corrode.
2×4 Dimensions in Metric (mm)
For international projects or working with metric plans:
| Dimension | Imperial | Metric |
|---|---|---|
| Width (actual) | 1.5″ | 38 mm |
| Height (actual) | 3.5″ | 89 mm |
| Standard length (8 ft) | 96″ | 2,438 mm |
| Standard length (10 ft) | 120″ | 3,048 mm |
| Standard length (12 ft) | 144″ | 3,658 mm |
Expert Tips from the Job Site 🛠️
Pro Guidelines
- Buy extra — always: Order at least 10% more than your calculation; culling bad boards at the yard is normal
- Hand-select your boards: Never let the yard pick them for you — dig through the stack for the straightest lumber
- “Measure twice, cut once” is cliché because it’s true — mark your cut line with a sharp pencil, not a fat marker
- Crown your studs up: Every stud has a slight crown (curve) — always install with the crown facing up so the load straightens it over time
- Use the right blade: A 24-tooth carbide-tipped blade cuts 2×4s cleanly and quickly; fine-tooth blades are slower and burn the wood
- Let green lumber dry first: If you must use green lumber, leave it stacked with stickers for 2–4 weeks before building — it will shrink significantly
Frequently Asked Questions
What is the actual size of a 2×4?
A 2×4 is actually 1.5 inches wide by 3.5 inches tall. The “2×4” name is the nominal (traditional) size, not the true measurement.
Why is a 2×4 not 2 inches by 4 inches?
The lumber is dried and planed after rough cutting, which removes approximately 1/4 to 1/2 inch from each dimension. The nominal 2×4 name has been kept since the 1800s purely as a trade convention.
What is a 2×4 in millimeters?
The actual size of a 2×4 is 38 mm × 89 mm. Standard 8-foot length is 2,438 mm.
Is a 2×4 the same size in Canada and the US?
Yes. Both countries follow harmonized lumber standards — a 2×4 is 1.5″ × 3.5″ (38 × 89 mm) in both the US and Canada.
What is the actual length of a 2×4?
Lengths are sold in even increments: 8 ft, 10 ft, 12 ft, 14 ft, 16 ft, and 20 ft. These are true lengths — the nominal-vs-actual discrepancy only applies to width and thickness, not length.
How much does a 2×4 weigh?
A standard 8-foot kiln-dried SPF 2×4 weighs approximately 9 to 17 pounds, depending on species and moisture content. Green (wet) lumber can weigh significantly more.
Can I use a 2×4 for load-bearing walls?
Yes — 2×4 studs are the standard for load-bearing walls in residential construction when spaced 16″ on center. For taller walls, heavily loaded spans, or exterior walls requiring more insulation, 2×6 framing is preferred.
What is the difference between a 2×4 and a 2×6?
A 2×6 actual size is 1.5″ × 5.5″ — same width as a 2×4 but taller. It provides more structural strength and allows for thicker insulation in exterior walls (R-21 vs. R-15 with 2×4 framing).
 - Pneumatic, Cordless & Budget Picks")


