A stud finder does not see wood. It measures something that changes when wood is behind the wall: the metal in a drywall screw, or the way the wall stores an electric charge. Once you know which one your tool measures, you know why it sometimes gets it wrong.
This guide explains the four types of stud finder, how each one works, and where each one fails. If you just want a recommendation, see our best stud finder roundup, which compares 12 models.
Why You Need a Stud at All
Drywall is gypsum pressed between paper. It holds a picture hook, but it crumbles under a steady pull. A wall stud, usually a 2×4 behind the drywall, is solid wood or steel. Anything heavy, like a TV mount, a mirror or a loaded shelf, should screw into a stud. In most US homes, studs sit 16 inches apart, center to center. Some newer homes use 24 inches.
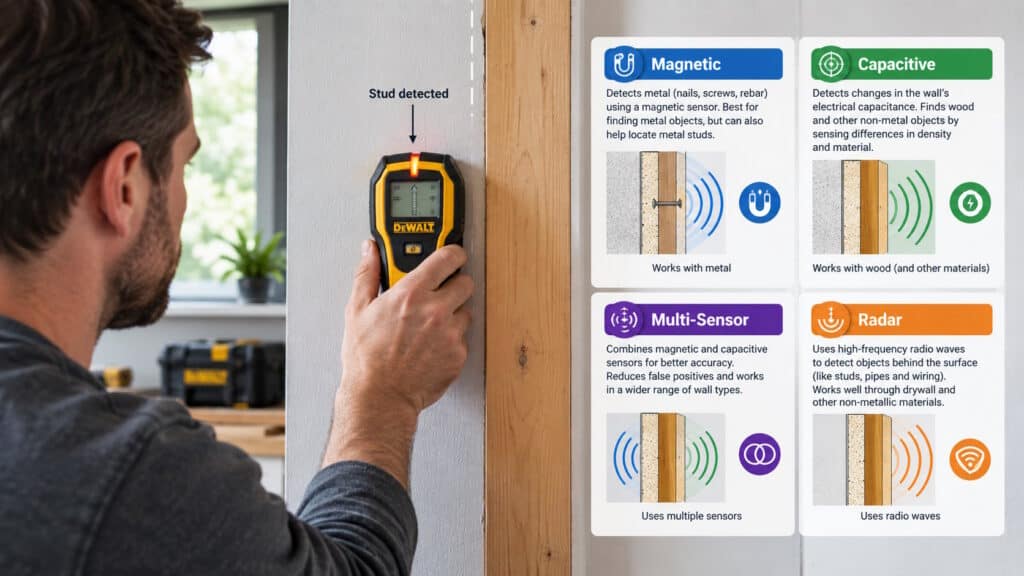
1. Magnetic Stud Finders: They Find the Screws
A magnetic stud finder holds a strong magnet, usually neodymium. Drywall is screwed or nailed to every stud, so when the magnet passes over a screw head, it pulls toward the wall and sticks.
- What it measures: steel fasteners, not wood.
- Strength: no batteries, and it is never fooled by changes in wall density.
- Weakness: slow on a big wall, and it finds any steel, including nail plates and some pipes. It does not show the stud’s edges.

2. Capacitive (Electronic) Stud Finders: They Sense Density
Most electronic stud finders use capacitance. A sensor plate inside the tool holds a small electric field against the wall. Drywall over an empty cavity and drywall over a solid stud change that field by different amounts, because wood has a different dielectric constant than air. The circuit watches for that change and lights an LED or beeps.
- Edge finders flag the point where the reading changes, which is the stud’s edge. You find both edges and mark the middle.
- Center finders watch the reading rise and fall across the stud and mark the peak.
Single-sensor models must calibrate first. When you press the button, the tool treats the spot under it as “empty wall.” If you start over a stud, every reading after that is wrong. That is the most common reason a stud finder seems broken.
Typical depth is 3/4 inch, which is fine for standard 1/2-inch drywall. Deep-scan modes push this to about 1-1/2 inches for thicker walls.
3. Multi-Sensor Stud Finders: A Row of Capacitive Sensors
Multi-sensor stud finders, like the Franklin ProSensor line, put 9 to 13 capacitive sensors side by side under a row of LEDs. Instead of sliding to find one edge and then the other, you see the whole stud width at once.
Because the tool compares its own sensors to each other, it does not need a calibration step. You can start right on top of a stud. That is why this type is the easiest for beginners to trust. Larger sensors, as on the Franklin ProSensor MAX, read deeper, up to 2.5 inches according to Franklin, which helps with plaster, tile and double drywall.
4. Wall Scanners and Radar-Style Imagers
Wall scanners, like the Bosch GMS120-27, combine several sensors: capacitive for wood, inductive coils for metal, and an AC sensor for live wires. Some also detect copper pipe. They are built for renovation work, where knowing what else is in the wall matters as much as the studs.
Radar or radio-frequency imagers go further and build a picture of what is behind the wall, often on a phone screen. They are useful in complex walls but cost much more than a standard stud finder, and they still need the user to interpret the image.
Live-Wire Detection: How It Works
Many stud finders add a separate AC sensor that picks up the alternating electric field around a live, unshielded wire. It is a warning, not a guarantee. It will not see wires that are switched off, shielded in metal conduit, or deeper than its range. Before cutting into a wall near outlets, check with a proper voltage tester and turn off the breaker.
Why Stud Finders Get It Wrong
- Bad calibration: starting over a stud on a single-sensor model.
- Plaster and lath: hand-applied plaster changes thickness across the wall, so density readings jump around.
- Pipes, ducts and blocking: anything dense reads like a stud. Dry plastic pipe is usually invisible.
- Foil-backed insulation or metallic wallpaper: blocks or skews the electric field.
- Moving too fast or tilting the tool.
The fix is to cross-check. Find one stud, measure 16 inches to the next, and confirm with a magnet or a small nail before drilling a big hole.
Which Type Should You Buy?
- Drywall house, occasional use: a multi-sensor finder or a $10 magnet.
- Old plaster walls or tile: a deep-scan multi-sensor model, confirmed with a magnet.
- Renovation or electrical work: a wall scanner with metal and live-wire modes.
Our best stud finder guide lists specific models for each case, with current prices.
Planning to mount pegboard or French cleats on your wall? See our guide on French cleat vs. pegboard tool storage for what to build and where studs actually matter.