Dealing with LiftMaster Error Code 4-6 can be frustrating, especially when it stops your garage door from closing with the remote. This error code means one specific thing: the opener’s safety sensors have detected — or think they’ve detected — an obstruction in the door’s path.
When this error occurs, you’ll see the opener’s light flash 4 times, pause, then flash 6 times. The door will not close using the remote, but it will close if you press and hold the main wall button. That difference is intentional — it’s a built-in safety feature.
In this guide, we walk you through every troubleshooting step to clear the obstruction, re-align your sensors, and get your garage door opener back on track.
⚡ Key Takeaways: What Error Code 4-6 Means
- The Problem: The safety sensors (two small “eyes” near the bottom of the door track) detected an obstruction or are misaligned.
- The Symptom: The garage door won’t close with the remote. The opener light flashes a 4-6 pattern.
- The Solution: Clear any obstruction, clean the sensor lenses, or re-align the sensors.
- The Quick Test: Look at the two LED lights on the sensors. One should be steady amber (sending) and the other steady green (receiving). If the green light is flashing or off, that’s your problem.
LiftMaster Error Code 4-6 indicates a safety sensor issue — not a problem with the opener motor itself.
What LiftMaster Error Code 4-6 Means (In Plain English)
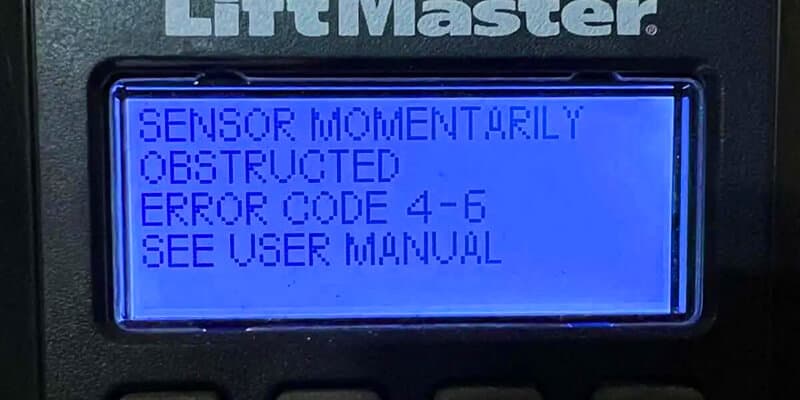
When your LiftMaster displays error code 4-6, the UP arrow flashes 4 times, followed by the DOWN arrow flashing 6 times. This is a precise diagnostic code built into the opener’s logic board — not a random malfunction.
If you have a newer myQ-enabled LiftMaster opener, you may also see this message in the myQ app: “Sensor Momentarily Obstructed” or simply “Error 4-6.”
What it means: The safety reversing sensors (photo eyes or infrared sensors) cannot establish or maintain the invisible infrared beam between them. The opener’s computer refuses to close the door remotely — it assumes something is in the way that you can’t see.
This safety feature has been federally mandated on all garage door openers manufactured after 1993, designed to prevent the door from closing on children, pets, or objects in its path.
Common Causes of LiftMaster Error Code 4-6
- Physical obstruction in the sensor beam path (boxes, bikes, tools, debris)
- Misaligned sensors no longer pointing directly at each other
- Dirty sensor lenses covered with dust, cobwebs, or grime
- Direct sunlight or glare hitting the receiving sensor (common during early morning or late afternoon)
- Loose or bent sensor brackets shifted by vibration or accidental bumps
- Damaged, corroded, or loose wiring between sensors and the main opener unit
- Sensors mounted at different heights or wired incorrectly during installation
- Incorrect force settings causing the opener to misread mechanical resistance as an obstruction
How to Fix LiftMaster Error Code 4-6 (Step-by-Step)
Don’t call a repair person yet. In most cases, this is a simple fix you can do yourself in under 15 minutes. Follow these steps in order.
Step 1: Check for Obvious Obstructions
Walk over and look at the floor-level path between the two sensors. Is there a box, a bicycle, a shovel, or a trash can blocking the beam? Even a broom leaning against the wall can trigger it. Move any items out of the sensor path and try the remote again.
Step 2: Clean the Sensor Lenses
The sensor “eyes” get dirty over time. Cobwebs, dust, pollen, or a smudge of grime can scatter the infrared beam enough to trigger the error. Take a soft, dry cloth and gently wipe both sensor lenses clean.
Step 3: Check and Realign the Sensors (The LED Method)
This is the most common fix. The sensors must be aimed directly at each other — they often get knocked out of position by equipment, a bouncing ball, or normal door vibration over time.
How to read the LED lights:
- Sending Sensor (Amber LED): Must show a solid, steady amber light. If it’s off or flickering, you may have a wiring or power issue — skip to Step 4.
- Receiving Sensor (Green LED): Must show a solid, steady green light. If it is flashing or off, the sensor is not receiving the amber beam — it is misaligned.
How to realign: Loosen the wing nut on the sensor showing a flashing green light. Gently nudge the sensor up, down, left, or right — very slightly — while watching the green LED. When aligned correctly, the green light will stop flashing and glow solid. Tighten the wing nut firmly and test the remote.
Height check: Both sensors must be mounted at exactly the same height, no more than 6 inches above the floor.
Step 4: Inspect the Sensor Wiring
- Trace the thin wires from both sensors back to the main opener unit.
- Look for breaks, cuts, pinches, or corroded sections — especially at staple points.
- Check that the wire terminals on the back of the motor unit are fully seated and tight.
- Confirm the outlet the opener is plugged into has power — a tripped GFCI or breaker can trigger a false fault.
Step 5: Check the Force Settings
- Locate the force adjustment controls on your opener unit (check your owner’s manual).
- Increase the force setting one notch at a time if manual dials are present.
- On newer models, cycle through Light, Medium, and Heavy using the UP/DOWN buttons to match your door weight.
Step 6: Power Cycle the Opener
If all sensors look good and the lights are solid but the error persists, unplug the opener from the ceiling outlet, wait 60 seconds, then plug it back in. This fully resets the logic board and clears any temporary fault memory.
A 60-second power cycle resets the logic board and can clear a stubborn 4-6 error after sensor fixes.
Advanced Troubleshooting: If LiftMaster Error Code 4-6 Keeps Coming Back
Sunlight Interference
- Error only occurs at certain times of day
- Door works perfectly at night or on overcast days
- Must hold wall button during sunny hours
Solutions:
- Swap sensor positions: Place receiving sensor in shade.
- Install LiftMaster Safety Sensor Sunblocker Kit.
- Temporary fix: cardboard or PVC tube around sensor lens.
Door Balance and Physical Operation
Pull the red emergency release handle and manually lift the door halfway. If it slams or shoots up, springs need professional adjustment.
Sensor Bracket Condition
- Sensors must be at exactly the same height
- Brackets must be firmly tightened
- Replace or straighten bent/cracked brackets
- Use thread-locking compound if door vibration shifts sensors
Sensor Replacement
If LEDs never light up despite good power/wiring, or sensors are 10+ years old and damaged/corroded, replace the pair (~$20–$40). Tools: screwdriver and pliers; install takes ~15 minutes.
When to Call a Garage Door Professional
- Sensor LEDs stay off even after inspection
- Damaged or chewed wiring inside walls or conduit
- Door is heavy, crooked, or slams shut manually (broken spring)
- Multiple error codes appear with 4-6
- Error persists after all DIY steps
- Uncomfortable working around springs, cables, or electricals
⚠️ Important Safety ReminderNever tape over, bypass, or permanently disable the safety sensors. The “press and hold” wall button method is a temporary diagnostic tool — not a permanent solution.
LiftMaster Error Codes Diagnostic Chart
If fixing the sensors didn’t solve your problem, or if your opener shows a different pattern, use this chart. Count the UP and DOWN arrow flashes to identify your error code.
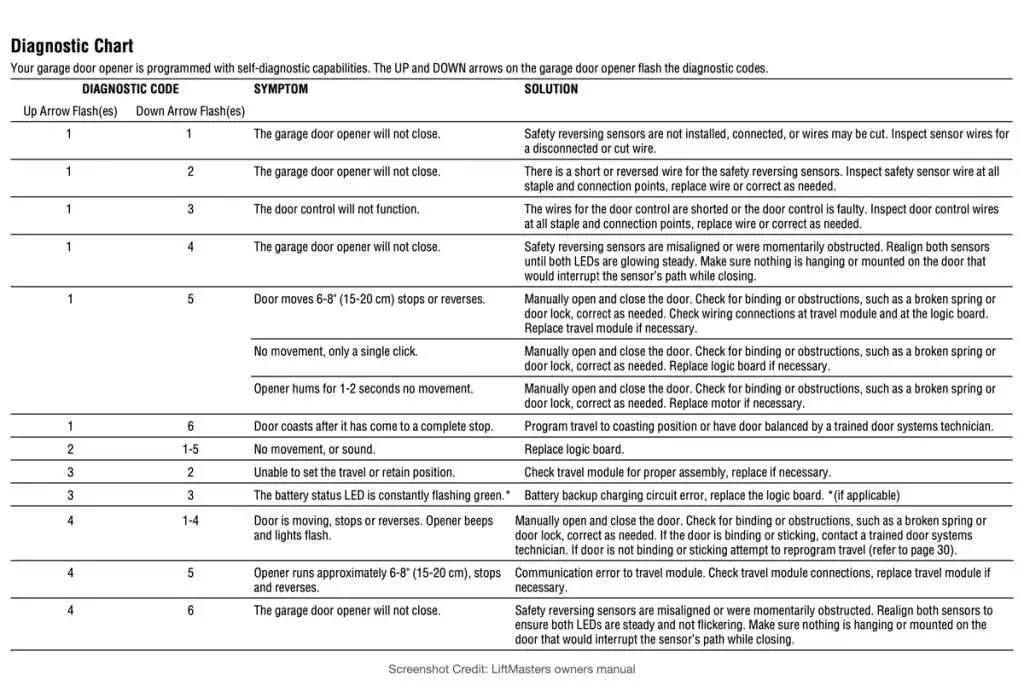
Full LiftMaster diagnostic flash code reference — count UP and DOWN arrow flashes to find your error code.
| Error Code | Symptom | Solution |
|---|---|---|
| 1-1 | Door won’t close | Check sensor installation and wiring for damage or missing sensors. |
| 1-2 | Door won’t close; shorted sensor wire | Inspect sensor wiring for shorts — check every staple point along the wire run. |
| 1-3 | Wall control malfunction | Check wall control wiring for shorts or reversed wires. |
| 1-4 | Door won’t close | Ensure safety sensors are aligned, unobstructed, and showing correct LED colors. |
| 1-5 | Door reverses after moving a few inches | Test manual door operation; check springs and track for obstructions. |
| 1-6 | Door coasts past stopping point | Reprogram travel limits; consult a professional for spring adjustment. |
| 3-2 | Unable to set travel or retain position | Replace the travel module. |
| 3-3 | Battery LED constantly flashing green | Investigate circuit board; replace if necessary. |
| 4-1 through 4-4 | Door stops, reverses, beeps, lights flash | Check for obstructions, broken springs, or an activated door lock; call a professional if needed. |
| 4-2 | Excessive opening force detected | Likely a broken spring — do not continue operating; call a technician. |
| 4-5 | Opener runs 6–8 inches then reverses | Check travel module connections; replace module if needed. |
| 4-6 | Sensor momentarily obstructed | Follow this guide: check blockages, clean lenses, realign sensors, inspect wiring, check force settings. |
")


