If your bathroom fan sounds like a jet engine, barely clears the mirror, or quit altogether, you can usually change it yourself in an afternoon. How hard the job is depends on one thing: whether you can get above the ceiling. This guide helps you pick the right path first, then walks through how to change an exhaust fan in a bathroom step by step, with the sizing, venting and wiring checks most guides skip.
Quick answer: Turn off the breaker and test for power. Remove the grille and motor, disconnect the wires and duct, and pull out the old housing. Fit the new housing from the attic, or use a retrofit fan that installs from below. Connect the duct with foil tape, wire black to black, white to white and ground to ground, then test it and snap on the grille.
Quick Picks
- Best no-cut drop-in for small builder fans: Broan-NuTone 50 CFM (688 style)
- Best for no attic access: Broan-NuTone Roomside Retrofit, 110 CFM with Light
- Best quiet upgrade: Panasonic WhisperFit DC FV-0511VF1
Comparison Table
Prices and ratings are from Amazon on 2026-11-18 and change often.
| Product | CFM | Sones | Install | Price | Rating |
|---|---|---|---|---|---|
| Broan-NuTone 50 CFM | 50 | 2.0 | No-cut, from below | $21.98 | 4.6 (776) |
| Broan-NuTone Roomside Retrofit | 110 | 1.0 | From below, larger grille | $129.00 | 4.3 (725) |
| Panasonic WhisperFit DC | 50 / 80 / 110 | Up to 0.8 (rated) | Bracket, easiest from attic | $134.99 | 4.6 (1,604) |
First, Pick Your Path
There are three ways to change a bathroom fan. Pick the right one before you buy anything, because it decides what you buy, how long it takes and how much ceiling you’ll cut.
| Path | When it fits | Typical time |
|---|---|---|
| Replace only the motor | The housing, duct and wiring are fine, and the fan is just noisy or dead. A matching motor exists for your model. | 30-60 minutes |
| Replace the whole fan from below | No attic above the bathroom (second floor under living space, condo, finished attic). | 1-3 hours |
| Replace the whole fan from the attic | You can reach the top of the fan housing. Easiest way to upsize the fan or the duct. | 2-4 hours |
Home Depot rates a full fan swap as an “Advanced” project and estimates 2 to 4 hours (Home Depot, retrieved 2026-11-18). A motor swap or a no-cut drop-in usually goes faster.
Measure Before You Buy
This is the step most people skip, and it’s why replacement fans get returned. With the breaker off, pull the grille down and check four things.
- The model sticker. It’s usually inside the housing. If you want to replace only the motor, you need this number.
- The housing opening. Measure length and width. Many older builder-grade fans have a small housing around 7-1/4 x 7-1/2 inches. A new fan with the same footprint can often drop in with no cutting. A bigger fan means enlarging the hole.
- The housing depth. Your new housing has to fit in the ceiling joist space. A fan with a 5-5/8 inch deep housing needs at least 2×6 joists.
- The duct size. Look at the round outlet on the side of the housing. Most are 3-inch or 4-inch. This matters more than people think (see the venting section below).
How much CFM do you need?
CFM is cubic feet per minute, the amount of air the fan moves. The Home Ventilating Institute (HVI) recommends 1 CFM per square foot of floor area for bathrooms up to 100 square feet. For larger bathrooms, add 50 CFM for each toilet, shower and tub, and 100 CFM for a jetted tub (HVI, retrieved 2026-11-18). The building code minimum is 50 CFM for a fan you switch on and off (Fantech, retrieved 2026-11-18).
So a 5 x 8 foot bathroom (40 square feet) gets a 50 CFM fan, the code minimum. An 8 x 10 bathroom (80 square feet) needs about 80 CFM.
How quiet is quiet?
Fan noise is rated in sones. Lower is quieter. To earn ENERGY STAR, a bathroom fan from 10 to 200 CFM can be no louder than 2.0 sones (ENERGY STAR, retrieved 2026-11-18). A fan at 1.0 sone or below is quiet enough that people actually leave it running long enough to clear the steam.
Tools and Materials
- Non-contact voltage tester
- Drill/driver and screwdrivers
- Drywall saw or oscillating tool (if the hole needs enlarging)
- Wire strippers and wire connectors
- Foil tape (not cloth duct tape) and a duct clamp
- New 4-inch insulated duct, if you’re replacing the duct
- A sturdy step ladder. If you’re shopping for one, our Gorilla Ladder breakdown covers whether a multi-position ladder is worth it.
- Safety glasses and a dust mask (old fans and attic insulation are dusty)
- Spackle and ceiling paint for touch-ups
How to Change a Bathroom Exhaust Fan: Step by Step
These steps cover a full fan replacement. If you’re only replacing the motor, see Option A below.
- Turn off the power and test. Switch off the breaker for the bathroom. Flip the fan switch on to confirm it’s dead, then hold a voltage tester near the wiring once you have the housing open. Don’t trust a breaker label without testing.
- Remove the grille and motor. Pull the grille down and squeeze the metal springs to release it. Most motors unplug from a receptacle inside the housing and come out after one or two screws.
- Photograph and disconnect the wiring. Open the small wiring box on the housing. Take a photo of how the wires connect before you undo anything. Then unscrew the wire connectors and separate the house wires from the fan wires.
- Disconnect the duct. From the attic, peel back the tape or loosen the clamp and slide the duct off the outlet. Without attic access, you can often reach the duct through the ceiling hole once the housing is loose.
- Remove the old housing. It’s usually screwed or nailed to a ceiling joist. From the attic, unscrew it. From below, you may need to cut through the nails or the drywall around the flange with an oscillating tool, then work the housing out.
- Size the opening. Hold the new fan’s template against the ceiling. If the opening is too small, trace and cut it larger. If you’re using a no-cut fan that matches the old size, skip this.
- Mount the new housing. From the attic, fasten it to the joist with the included brackets or screws. From below, use the retrofit brackets or clips that come with roomside fans. The housing should sit flush with the bottom of the drywall.
- Connect the duct. Slide the duct over the outlet, wrap the joint with foil tape and add a clamp. Check that the little damper flap on the outlet swings open freely.
- Wire it. Connect black to black, white to white and the bare or green ground to the fan’s ground. Twist on wire connectors, tug each wire to check it, and close the wiring box.
- Install the motor, test and finish. Plug in the motor if it ships separately. Turn the breaker on and run the fan. Hold a square of toilet paper near the grille opening: it should be pulled flat against it. Snap on the grille, then patch and paint any gaps in the ceiling.
Common wiring setups
- Fan only: one black, one white, one ground. The easy case.
- Fan and light on one switch: join both the fan and light black wires to the single black house wire.
- Fan and light on two switches: you’ll see two hot wires from the house (often black and red). One feeds the fan, one feeds the light.
- No ground wire, or cloth-covered wiring: stop and call an electrician.
Option A: Replace Only the Motor
If the housing, duct and wiring are in good shape and the fan just rattles or won’t spin, a new motor can be the quickest fix. Grab the model number from the sticker inside the housing and search for that exact model’s replacement motor. Broan, for example, sells genuine replacement motors for many of its fans, like the Broan S99080517 motor. Check your model is on the compatibility list before you buy.
Most motors plug into a receptacle inside the housing, so there’s no wiring to redo. Unplug the old one, remove its mounting screws, and fit the new one the same way.
A motor swap isn’t worth it if the fan is too small for the room, it’s very loud even when new, the duct is crushed or disconnected, or a motor costs close to what a whole new fan does.
Option B: No Attic Access
If there’s no attic above the bathroom, use a fan designed to install from the room side. Broan’s Roomside fans, for example, are built so a retrofit can be done entirely from below, including connecting the duct (Broan, retrieved 2026-11-18).
These fans usually have a larger grille that covers the old hole, so you don’t have to patch much drywall. The tricky part is reaching the duct. Once the old housing is out, reach up through the hole, pull the duct down a few inches, and connect it to the new housing before you push the housing up into place. If the duct won’t reach, a short piece of new duct and a coupler bridges the gap.
Make Sure It Vents Outside
This is the part a lot of old installations get wrong. Under the International Residential Code, bathroom exhaust has to go directly outside. It can’t end in the attic, a soffit vent, a ridge vent or a crawl space (Building Code Trainer, retrieved 2026-11-18). A fan dumping moist air into the attic can cause mold and rot on the roof deck.
How to check where yours goes
- From the attic: follow the duct from the fan. It should connect to a roof cap or a wall vent, not just lie on the insulation or point at a soffit.
- From outside: look for a vent cap on the roof or wall roughly above the bathroom. Run the fan and check for air coming out.
3-inch vs 4-inch duct
Many older fans use 3-inch duct. If you install a bigger fan, it may not move its rated airflow through the old 3-inch run. The Department of Energy’s Building America guidance says the duct should ideally be the same diameter as the fan’s outlet, and the fan should vent directly outside, not into an attic or crawl space (Building America Solution Center, retrieved 2026-11-18).
If you have attic access, upgrading to 4-inch duct at the same time is worth the extra hour. Keep the run short with as few bends as possible. In a cold attic, use insulated duct so warm, moist air doesn’t condense inside it and drip back down. Also note that flex duct adds resistance: Fine Homebuilding notes you should count insulated flex duct as 1.5 times its length when comparing it to smooth duct (Fine Homebuilding, retrieved 2026-11-18).
Wiring and Safety Notes
- Fan over a tub or shower: check the fan’s label and instructions. Fans approved for use over a tub or shower are typically marked for installation on a GFCI-protected circuit. If yours says that, follow it.
- Old wiring: cloth-covered wires, no ground, scorched insulation or aluminum wire mean it’s time for an electrician.
- Adding a timer or humidity switch: replacing the wall switch with a timer or a humidity-sensing switch makes sure the fan runs long enough after a shower. Make sure the switch is rated for fan motors.
- Ladder safety: work from a stable ladder, not a toilet or tub edge.
While you’re up on the ladder, it’s worth checking the date on any nearby smoke alarm. Here’s how long smoke detectors last.
Best Bathroom Exhaust Fans on Amazon
One pick for each replacement path above.
1. Broan-NuTone 50 CFM (688 Style) – Best No-Cut Drop-In for Small Builder Fans

This is the fan for the small, rattly builder-grade unit in a powder room or small bathroom. It was $21.98 on 2026-11-18, down from $24.00. It rates 4.6 stars across 776 ratings.

Per the listing, it moves 50 CFM for bathrooms up to 45 square feet and runs at 2.0 sones, and it’s ENERGY STAR certified. The housing is 7-1/4 x 7-1/2 inches, and foldable mounting brackets allow a no-cut installation with no attic access. The listing ties it to the Broan 688 line and says it’s made in the USA.
Key specs: 50 CFM; 2.0 sones; ENERGY STAR; 7-1/4 x 7-1/2 in housing; foldable no-cut brackets (per listing).
Pros: Very low price; matches the common builder-fan footprint, so it can drop into the existing hole; no attic needed.
Cons: 50 CFM is only enough for small bathrooms. At 2.0 sones it’s at the loud end of ENERGY STAR. It’s built around the small builder-fan size, which usually means a 3-inch duct, so check yours.
Not the right fit if: your bathroom is bigger than about 45 square feet or has a steamy shower. Look at the two picks below.
2. Broan-NuTone Roomside Retrofit with Light – Best for No Attic Access
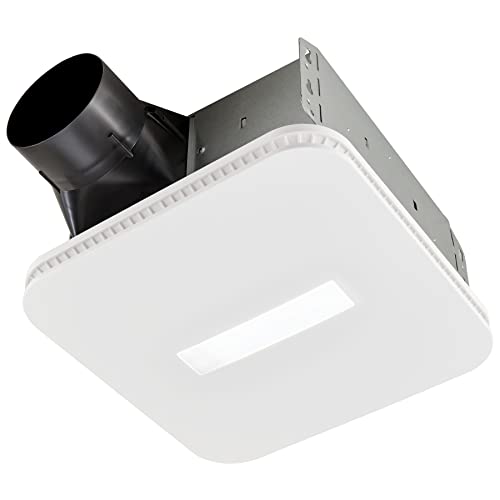
If there’s no attic above your bathroom and you want more airflow and a light, this is the one. It was $129.00 on 2026-11-18, down from a $179.00 list price. It rates 4.3 stars across 725 ratings.
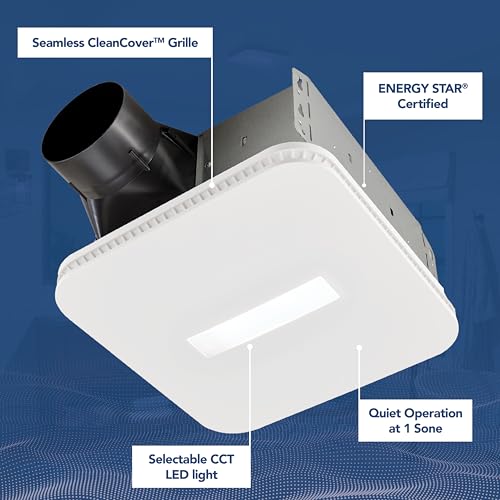
Per the listing, it replaces an existing fan without attic access. It moves 110 CFM for bathrooms up to 105 square feet at 1.0 sone. The LED light switches between four color temperatures from warm 3000K to cool 5000K. The CleanCover grille measures 12-1/4 x 12-1/4 inches, big enough to hide most old cutouts. The housing is 9-1/4 x 10 x 5-3/4 inches.
Key specs: 110 CFM; 1.0 sone; installs from the room side; selectable LED color temperature; 12-1/4 in square grille; 5-3/4 in housing depth (per listing).
Pros: No attic needed; quiet for its airflow; the large grille covers the old hole; the light is a real upgrade over a bare fan.
Cons: Lowest rating of the three. The 5-3/4 inch housing needs enough joist depth, so measure first. If you want the fan and light on separate switches, you need two hot wires at the fan.
Not the right fit if: you don’t want a light. Broan’s Flex 110 CFM roomside fan (1.0 sone, ENERGY STAR, 4.4 stars across 2,431 ratings) is the fan-only version of the idea.
3. Panasonic WhisperFit DC FV-0511VF1 – Best Quiet Upgrade
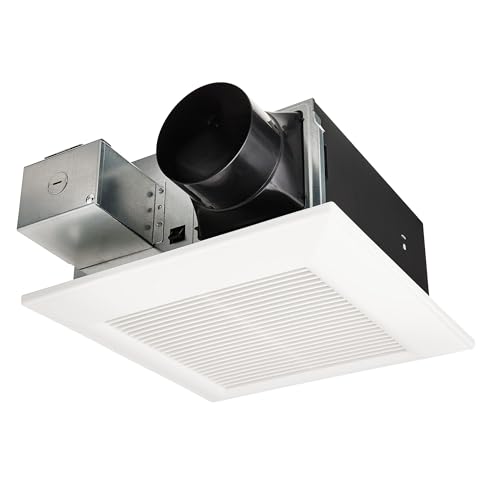
This is the pick if noise is your main complaint. It was $134.99 on 2026-11-18 and rates 4.6 stars across 1,604 ratings, the most of our three picks.
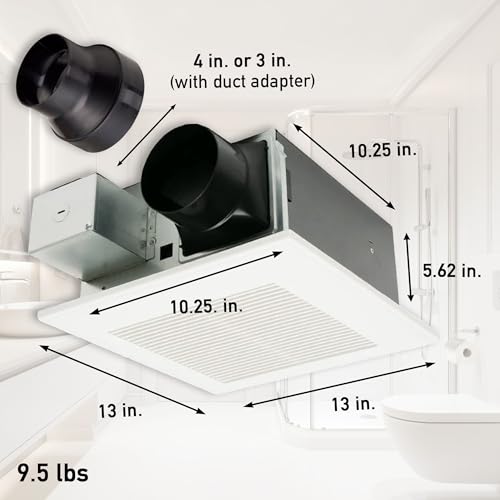
The listing describes a DC motor with a Pick-A-Flow switch that sets the fan to 50, 80 or 110 CFM, so one fan covers a powder room or a full bath. The housing is 5-5/8 inches deep and fits 2×6 joists or larger, and the Flex-Z Fast bracket hinges for positioning. Its ENERGY STAR listing rates it at 0.0 to 0.8 sones with a 4-inch duct (ENERGY STAR, retrieved 2026-11-18). Panasonic’s spec sheets show it also works with 3-inch duct.
Key specs: 50/80/110 CFM selectable; up to 0.8 sones rated; DC motor; 4-inch duct (3-inch compatible); 5-5/8 in housing depth; 10-1/4 in housing; 13 in grille.
Pros: Very quiet; adjustable airflow lets you match the room; DC motor uses little power; most-reviewed fan here.
Cons: Most expensive pick. The bracket installs most easily with attic access. The 10-1/4 inch housing is bigger than a small builder fan, so expect to enlarge the hole.
Not the right fit if: you want a no-cut swap for a small builder fan. Go with the Broan 50 CFM.
Troubleshooting
- Hums but won’t spin: the motor is seized or the wheel is jammed. Check the wheel turns freely by hand. If it doesn’t, replace the motor or the fan.
- Rattles or vibrates: a loose housing, motor plate or grille. Tighten the mounting screws and check nothing touches the wheel.
- Damper flaps in the wind: the exterior cap’s flap may be missing or stuck. Replace the cap.
- Water drips from the grille: usually condensation in an uninsulated duct running through a cold attic. Insulate the duct and make sure it slopes toward the outside vent.
- GFCI trips: check for a pinched wire or moisture in the wiring box. If it keeps tripping, call an electrician.
- Weak airflow: a crushed, kinked or very long duct, or a 3-inch duct on a big fan. Straighten or shorten the run, or upgrade to 4-inch.
Cost and Time
| Job | Parts (Amazon, 2026-11-18) | DIY time |
|---|---|---|
| Motor only | Varies by model | 30-60 min |
| No-cut 50 CFM drop-in | About $22 | 1 hour |
| Roomside retrofit with light | About $129 | 1-3 hours |
| Quiet DC fan from the attic | About $135, plus duct and tape | 2-4 hours |
Add duct, foil tape, connectors and a roof or wall cap if the venting needs work. If you hire an electrician or handyman, labor will be extra and varies a lot by area, so get a quote.
FAQ
Can I replace a bathroom fan myself?
Yes, if you’re comfortable shutting off a breaker, testing for power and making basic wire connections. A same-size swap or motor replacement is a good first electrical project. Call an electrician for old or ungrounded wiring, or if you need a new circuit.
Can I replace the fan without replacing the housing?
Often, yes. If the housing is solid, you can replace just the motor with one made for your model. Some brands also sell upgrade kits that fit their old housings.
Do I need an electrician?
Not for a like-for-like swap on good wiring. You do if the wiring has no ground, is cloth-covered or damaged, or if you’re adding a fan where there wasn’t one.
How long does it take?
About 30 to 60 minutes for a motor swap, 1 hour for a no-cut drop-in, and 2 to 4 hours for a full replacement with duct work.
Can a bathroom fan vent into the attic?
No. The code requires it to vent directly outside. Venting into the attic puts moisture right where it can cause mold and rot.
What size fan do I need?
1 CFM per square foot of floor area for bathrooms up to 100 square feet, with a 50 CFM minimum. For larger bathrooms, add 50 CFM per toilet, shower and tub.
Do I need GFCI for a fan over the shower?
Follow the fan’s label. Fans approved for over a tub or shower are typically marked for installation on a GFCI-protected circuit.
How long do bathroom exhaust fans last?
There’s no fixed lifespan. It depends on how much the fan runs and how well it’s built. Replace it when it gets loud, stops clearing the mirror, or won’t spin. Cleaning the grille and wheel once or twice a year helps it last longer.
Bottom Line
Pick your path first, measure the housing and duct, then buy:
- Small builder fan, no attic, small bathroom: Broan-NuTone 50 CFM.
- No attic access, want more airflow and a light: Broan-NuTone Roomside Retrofit.
- Want the quietest fan and can reach from the attic: Panasonic WhisperFit DC.
- Housing is fine, motor is dead: a replacement motor for your exact model.
Whatever you install, make sure it vents outside, and leave it running after every shower until the mirror is clear.