
Picture this: you’re halfway through hand-planing a beautiful piece of white oak, and the board shoots across the bench for the third time in a minute. You’ve shimmed it, wedged it, and sworn at it. What you actually needed was a good bench vise — the kind that clamps your stock firmly in place so you can focus on the work instead of chasing it around the shop.
A quality woodworking bench vise is arguably the most important upgrade you can make to a workbench. The right one transforms a frustrating struggle into smooth, controlled work whether you’re planing edges, cutting dovetails, or routing a mortise. The wrong one — or a machinist’s vise used on wood — leaves dents, slips under pressure, and eventually ends up gathering dust in the corner.
We tested and evaluated seven of the most-recommended bench vises across every budget tier under real workshop conditions, from light weekend projects to daily hand-tool work. In this guide you’ll find honest reviews of each, a complete buying guide covering jaw width, quick-release mechanisms, materials, and installation — plus everything top competitors skip, including a full installation walkthrough and a jaw-size selector.
Whether you’re fitting out your first bench or replacing a worn-out vise on a shop you’ve run for years, this guide has the answer.
Quick Comparison: Best Bench Vises at a Glance
| Model | Jaw Width | Quick-Release | Best For | Price Tier |
|---|---|---|---|---|
| Yost M7WW ⭐ Best Overall | 7 in. | ✅ | Most woodworkers | Mid-range |
| Wilton 78A 👑 Premium | 7 in. | ✅ | Lifetime buy / serious shops | Premium |
| Pony Jorgensen 27091 💰 Budget | 7 in. | ✅ | Entry-level, budget shops | Budget / Mid |
| Eclipse Quick-Release ✋ Hand-Tool | 9 in. | ✅ | Hand-tool purists | Mid-range |
| Yost M9WW 📐 Wide Capacity | 9 in. | ✅ | Wide board work | Mid-range |
| IRWIN 226361 🔰 Beginner | 6.5 in. | ❌ | Beginners / light use | Budget |
Types of Woodworking Bench Vises Explained
Before you spend a dollar, it’s worth understanding what type of vise actually fits your work. Most people default to whatever they see first — often a face vise — and that’s usually fine. But if you primarily do hand-tool work or regularly wrestle wide panels, choosing the wrong type will limit you every time you step to the bench.
Face Vise (Front Vise) — The Best Starting Point
The face vise mounts to the front edge of your workbench and is the most versatile starting point for any woodworker. It’s equally capable of holding boards on edge for planing, securing work vertically for sawing, or gripping pieces at an angle for dovetailing. Two subtypes exist: fully assembled cast-iron vises (with metal jaws you’ll want to face with wood) and vise hardware kits where you supply your own wooden jaws, which gives a cleaner look and a perfectly custom fit to your bench thickness.
If you’re right-handed, mount your face vise at the left front corner of your bench so your dominant hand is free to work. Left-handers do the opposite. This placement lets you transfer clamping force directly into the bench leg structure, minimizing flex under heavy loads.
End Vise (Tail Vise)
An end vise mounts to the tail end of the bench — the short end — and is the best choice for surface planing and panel flattening. Its real power comes from working with bench dogs: a dog extends from the vise jaw while a second dog sits in one of the holes drilled along the bench top. Together they clamp long boards flat across the bench surface, leaving both hands free to use a hand plane. This setup is a game-changer for face work on wide lumber.
An end vise isn’t a good first vise — it’s best added alongside an existing face vise once you know you’ll do a lot of face planing. It’s also a more complex installation than a front vise.
Leg Vise — Beloved by Hand-Tool Woodworkers
The leg vise is the traditional choice for serious hand-tool shops, and competitors almost never cover it properly. Unlike a face vise, the leg vise attaches directly to a bench leg rather than the front apron, giving it an enormous clamping area and exceptional holding strength for vertical work. It’s ideal for tasks like drawknife work, tenon sawing, and edge planing of wide stock because the jaws can be very tall — often 10 to 14 inches — with no top rail in the way.
One important detail: leg vises require an adjustable parallel guide (sometimes called a crisscross or a parallel iron) at the foot of the vise to keep the jaws parallel when clamping thick stock. Without it, the jaws rack and grip unevenly. Installation is more involved than a face vise, and leg vises are often shop-made or sourced as hardware kits rather than sold fully assembled — but for the dedicated hand-tool woodworker, nothing else comes close.
Twin-Screw Vise — The Dovetailer’s Secret Weapon
Twin-screw vises use two parallel screws to drive a single wide jaw, typically 16 inches or more across. The twin-screw design eliminates racking entirely when clamping wide boards, because the load is distributed evenly across both screws. This makes them outstanding for dovetailing wide drawer fronts and cabinet sides, holding large panels, and any work where you need to grip a board vertically in the center of the jaw without it tilting.
The Veritas Twin-Screw is the benchmark model in this category. It can be mounted as either a front or end vise. It lacks a quick-release mechanism — each screw must be wound individually — but for the precision and stability it provides on wide stock, most users consider that a fair trade-off.
Machinist’s Vise — Know When NOT to Use It
A quick word of caution: a machinist’s or engineer’s vise is not a woodworking vise. The serrated steel jaws that grip metal securely will crush and dent wood fibers on contact, even on a light clamp. If you have a mixed shop and want to use a machinist’s vise on wood occasionally, always attach soft jaw pads or clamp wood faces over the jaws first. But for any serious woodworking, you want a dedicated vise with smooth jaws you can face with hardwood liners.
The 7 Best Bench Vises for Woodworking — Full Reviews
⭐ Best Overall: Yost M7WW 7-Inch Rapid Action Woodworking Vise

| Yost M7WW — Key Specs | |
|---|---|
| Jaw Width | 7 inches |
| Max Opening | 10.5 inches |
| Weight | 21 lbs |
| Material | 30,000 PSI cast iron |
| Quick-Release | Yes — lever-actuated |
| Bench Dog | Yes — built-in |
The Yost M7WW earns its best-overall title by hitting every important mark without asking you to break the bank. Its 7-inch jaw handles the vast majority of woodworking tasks — edge planing, dovetailing, routing, vertical sawing — without consuming an unreasonable amount of bench space. The rapid-action quick-release lever is one of the smoothest we tested: disengage, slide the jaw to your workpiece in one motion, then lock it down. Once you’ve used quick-release, going back to a full-screw vise feels like punishment.
The design detail that sets the M7WW apart from budget cast-iron vises is the slight inward toe of the sliding jaw. When you tighten the vise, the top of the jaw tilts fractionally inward, clamping your workpiece harder at the top edge where it matters most for edge planing. This reduces jaw racking under pressure and keeps thin stock from creeping out of the grip. The built-in bench dog pairs with dog holes drilled in your bench top for panel clamping.

Two minor notes: the vise ships with a heavy coat of protective grease that needs cleaning before use (a solvent rag and 10 minutes sorts it out), and at 21 pounds it’s not something you’ll move around often — plan your placement carefully before bolting it down.
Who it’s for: Anyone building or upgrading a general-purpose woodworking bench. It’s the right vise for 80% of readers. Who should skip it: Dedicated hand-tool woodworkers who work primarily with wide stock (consider the Eclipse or Veritas twin-screw instead).
👑 Best Premium / Lifetime Buy: Wilton 78A Woodworking Vise

| Wilton 78A — Key Specs | |
|---|---|
| Jaw Width | 7 inches |
| Max Opening | 10.5 inches |
| Weight | 23 lbs |
| Material | High-grade cast iron |
| Quick-Release | Yes — half-turn lever |
| Bench Dog | Yes — built-in |
The Wilton 78A is the vise woodworkers inherit from their fathers. That’s not marketing copy — it’s a genuine pattern you see repeated across woodworking forums and shop tours: someone mentions their vise and follows up with “actually my dad bought it in the ’70s and it still works perfectly.” The 78A is built to that standard. Tight tolerances, smooth screw action, and cast iron machined to dimensions that simply don’t flex under load.
The premium price is the main hesitation for most buyers. The honest counterargument is the lifetime cost calculation: a budget vise from an import brand might last five to ten years in regular use before the screw threads wear, the quick-release stutters, or a guide rod bends. Buy three of those over a 30-year woodworking career and you’ve spent more than the Wilton costs once. For anyone who treats their tools as long-term investments rather than disposables, the 78A is the correct economic choice, not just the emotionally satisfying one.
Performance is what you’d expect from the price: the screw is silky, the jaw closes without any perceptible play, and the quick-release snaps on and off cleanly. The jaw faces are smooth cast iron — you’ll want to add hardwood liners before use, as with any metal-jaw vise.
Who it’s for: Experienced woodworkers building a permanent shop and anyone who wants to buy once and be done. Who should skip it: Beginners who aren’t sure how committed they are to the craft, or anyone on a tight budget — the Yost M7WW covers 95% of the same use cases at a lower price.
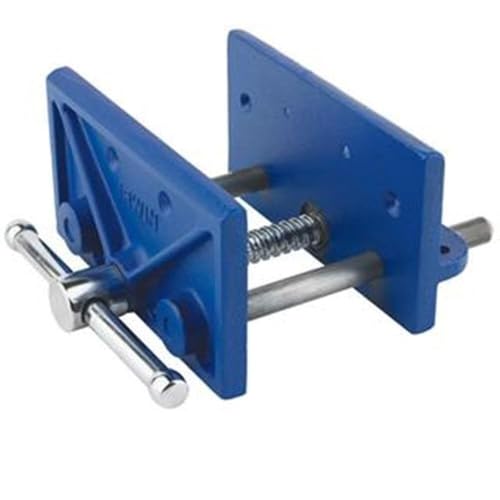
💰 Best Budget: Pony Jorgensen 27091 Woodworking Vise

| Pony Jorgensen 27091 — Key Specs | |
|---|---|
| Jaw Width | 7 inches |
| Max Opening | 10.5 inches |
| Weight | 17 lbs |
| Material | Cast iron |
| Quick-Release | Yes |
| Bench Dog | Yes — included |
The Pony Jorgensen 27091 punches significantly above its price point. The inner jaw faces are notably smoother than most budget competitors, meaning even if you don’t add hardwood liners immediately you’re less likely to mar softwood. Better still, the jaw faces are pre-drilled so you can bolt on wooden liners without drilling into the casting yourself — a thoughtful detail that saves time and reduces the chance of cracking a jaw.
Installation is flexible: the rear jaw can be mounted to both the front apron and the underside of the benchtop, which makes it easier to position on benches with non-standard apron dimensions. The included bench dog is a genuine addition at this price tier. Quick-release action is reliable, though not quite as smooth as the Yost or Wilton — a small gap you feel only when comparing them side by side, not in day-to-day use.

The one area where budget shows is in the screw’s finish. It benefits from a cleaning and re-greasing out of the box, and annual lubrication matters more here than on the premium options. Do that and the 27091 will reward you with years of capable service.
Who it’s for: Woodworkers on a tight budget, beginners building their first bench, and hobbyists who work in the shop occasionally rather than daily. Who should skip it: Daily-use production shops where longevity under heavy repetitive use matters — invest in the Wilton or Yost instead.
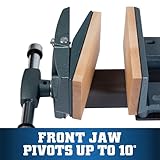
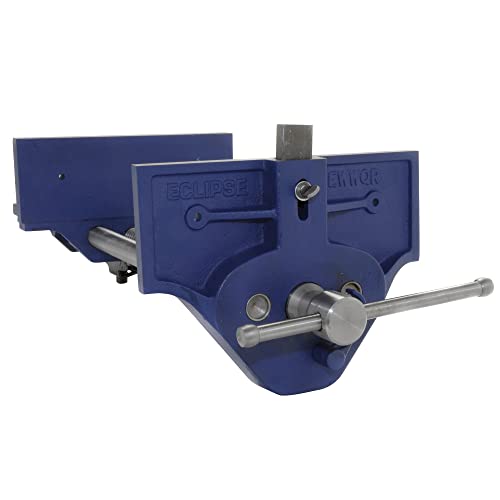
✋ Best for Hand-Tool Woodworking: Eclipse Quick-Release Woodworking Vise
| Eclipse Quick-Release — Key Specs | |
|---|---|
| Jaw Width | 9 inches |
| Max Opening | 13 inches |
| Weight | 22 lbs |
| Material | Cast iron |
| Quick-Release | Yes — spring-loaded |
| Bench Dog | Yes — built-in |
The Eclipse is the vise that professional toolmakers and serious hand-tool woodworkers keep recommending to each other quietly, as if it’s a secret. The defining feature is the toe-in design: the top of the sliding jaw tilts fractionally forward toward the work as the vise tightens. This geometry guarantees a positive, racking-resistant grip at the top of the jaw — exactly where you apply pressure with a hand plane or chisel. It sounds subtle but is immediately apparent in use: stock simply does not creep or pivot the way it can in conventionally designed vises.
The spring-loaded quick-release is among the fastest and most positive of any vise we tested — disengage, the jaw springs back, slide to position, re-engage. In a session of repetitive fitting and trimming work where you clamp and unclamp dozens of times, the Eclipse saves genuine minutes. The built-in bench dog and 9-inch jaw width handle wide stock without strain.
Eclipse’s reputation was built in professional toolrooms, and the construction reflects that heritage — tight tolerances, smooth screw, and guide rods that show no lateral play. The main trade-off is price: it sits in a similar bracket to the Wilton and is harder to source than the Yost or Pony, but worth the search for any serious hand-tool practitioner.
Who it’s for: Hand-tool woodworkers, professional craftspeople, and anyone who does repetitive clamping tasks where the toe-in grip and fast quick-release will pay dividends every session. Who should skip it: Power-tool woodworkers who clamp stock infrequently — you won’t use the Eclipse’s refinements enough to justify the cost over the Yost M7WW.

📐 Best for Wide Boards: Yost M9WW 9-Inch Rapid Action Woodworking Vise

| Yost M9WW — Key Specs | |
|---|---|
| Jaw Width | 9 inches |
| Max Opening | 12 inches |
| Weight | 26 lbs |
| Material | 30,000 PSI cast iron |
| Quick-Release | Yes — lever-actuated |
| Bench Dog | Yes — built-in |
The Yost M9WW is the M7WW’s bigger sibling, sharing the same rapid-action quick-release system and inward-toe jaw geometry on a 9-inch platform. If you regularly edge-plane boards in the 6–8 inch wide range — table legs, stiles, wide rails — the extra jaw width makes a meaningful difference. A 7-inch jaw gripping a 7-inch board is working at its limit; the M9WW grips the same board with 2 inches to spare on each side, which means the guide rods engage more evenly and clamping pressure distributes better across the piece.
Everything that makes the M7WW excellent applies here: smooth quick-release, positive jaw toe-in, solid 30,000 PSI cast iron construction. The weight steps up to 26 pounds, which reinforces the importance of positioning it over a bench leg — a 26-pound vise on a flexible bench section will telegraph every vibration back into your work. Mount it solidly and it disappears into the bench the way a good tool should.

The M9WW costs somewhat more than the M7WW. It’s worth the upgrade if your regular work involves boards wider than 6 inches. If most of your stock is narrower, the M7WW handles it just as well at a lower price.
Who it’s for: Woodworkers who frequently edge-plane wide boards, work with table slabs, or build furniture with wide case components. Who should skip it: Those whose work is primarily narrow stock — the M7WW handles it equally well for less.
🔰 Best for Beginners: IRWIN Tools 226361 Woodworking Vise
| IRWIN 226361 — Key Specs | |
|---|---|
| Jaw Width | 6.5 inches |
| Max Opening | 9 inches |
| Weight | 14 lbs |
| Material | Cast iron |
| Quick-Release | No |
| Bench Dog | No |
The IRWIN 226361 earns its place on this list by being genuinely well-suited to the beginner woodworker who isn’t sure yet how heavily they’ll use a vise. It’s lighter than any other vise here at just 14 pounds, making installation straightforward even for someone doing it alone for the first time. The 6.5-inch jaw handles standard dimensional lumber and smaller project pieces without issue, and the toe-in jaw design means it grips work reliably despite the entry-level price.
The absence of a quick-release is the most noticeable limitation compared to the rest of this list. For occasional use — a project or two a month — it’s perfectly acceptable. For regular session work where you clamp and unclamp frequently, you’ll feel the friction every time you wind the screw in and out. That’s the honest trade-off: the IRWIN costs meaningfully less than the Pony Jorgensen or Yost, and the quick-release mechanism is where that cost difference lives.

Mounting is refreshingly simple — straightforward lag bolt pattern, clear hole placement, and a light enough unit that a single person can hold it in position while drilling. For a first vise on a first workbench, it removes the complexity barriers that can discourage a new woodworker from getting started.
Who it’s for: Beginners and hobbyists who build occasionally, small-shop setups, or anyone who wants a low-commitment entry into bench vise ownership. Who should skip it: Anyone who builds regularly or foresees doing so — the Pony Jorgensen 27091 is a modest step up in price but a significant step up in longevity and quality.
Bench Vise Buying Guide: What Actually Matters
Jaw Width — How to Choose the Right Size
The most common buying mistake is conflating jaw width with vise quality or capability. They are separate things. A well-made 3.5-inch vise with precision-ground guide rods can grip more securely and resist racking better than a loose 7-inch import. Jaw width tells you how wide a piece you can comfortably grip, nothing more.
For most woodworking tasks — edge planing, vertical sawing, dovetailing, routing — a 6 to 7 inch jaw covers 90% of situations. This range handles standard dimensional lumber (1×4, 1×6, 2×4, 2×6) and most furniture components without consuming excessive bench space. The wider the jaw, the more bench front it occupies, which is a real trade-off on shorter benches.
Go to 9 or 10 inches if you regularly edge-plane boards wider than 6 inches, work with tabletop slabs, or build wide casework. The extra width means the guide rods engage a larger section of the jaw, which improves parallelism and reduces racking on wide stock. Keep in mind that a 9-inch vise also weighs more, costs more, and requires a correspondingly solid bench to anchor it effectively.
A practical decision framework: measure the widest board you edge-plane or grip vertically on a typical project. Add 2 inches for comfortable jaw clearance on each side. If that number is under 7 inches, buy a 7-inch vise. If it regularly exceeds 7 inches, consider 9 inches. Very few furniture woodworkers need 12 inches or more — that’s casework and cabinetry territory.
Quick-Release Mechanism
A quick-release mechanism lets you disengage the drive screw with a half-turn or lever press, slide the jaw rapidly to your workpiece by hand, and then re-engage the screw to tighten. The time savings on any task with frequent clamping changes are substantial — in a dovetailing session where you’re fitting individual tails and pins, a quick-release can save 20 to 30 minutes of screw-winding over the course of a day.
Once you’ve used a quick-release vise for a season, going back to a full-screw vise feels genuinely frustrating. The mechanism adds modest cost to a vise and is entirely reliable when kept clean and lubricated. For any woodworker who builds regularly, quick-release is strongly recommended. For very occasional use — a few projects a year — you can save money by skipping it and living with the manual screw.
Cast Iron vs. Ductile Iron vs. Forged Steel
Most woodworking bench vises are made from gray cast iron, which is appropriate for the loads involved. Cast iron absorbs vibration well, machines to tight tolerances, and is more than strong enough for woodworking clamping forces. Its one limitation is brittleness under impact — a sharp lateral blow can crack a cast iron jaw, though this rarely happens in normal woodworking use.
Ductile iron (also called nodular iron) is a higher grade that’s significantly more impact-resistant and less brittle than gray cast iron. It’s used in better-quality vises and is worth the small premium if you occasionally use your vise for light metalworking or other mixed shop tasks.
Forged steel is the highest-strength option — the metal is heated and hammer-formed, eliminating internal casting porosity and impurity flaws. It’s the material of choice for premium machinist’s vises, but is less common in woodworking vises and largely unnecessary for wood shop loads. For pure woodworking, cast or ductile iron is entirely sufficient and you should not pay a premium for forged steel in a woodworking vise specifically.
Jaw Faces — Always Add Wood Liners
Metal jaws — even smooth, lapped ones — will dent and mar wood, especially softwoods, under even moderate clamping pressure. This is not a quality issue; it’s physics. Before using any metal-jaw vise on a finished workpiece, add hardwood liners to both the fixed and sliding jaw faces. Cut them from 3/4-inch hardwood (maple, beech, and birch all work well), drill and countersink from the front face, and bolt them to the jaw using the pre-drilled holes most vises provide for exactly this purpose.
With hardwood faces installed, the vise grips work firmly without bruising it, and the wooden faces themselves have enough friction to resist slippage even on smooth, finished surfaces. Replace the faces when they develop significant compression marks or when the wood compresses enough to affect clamping performance — typically every few years of regular use.
Bench Dogs — Do You Need Them?
A bench dog is a square or round peg that extends from a hole in the vise jaw. A matching dog installed in a hole drilled in your bench top lets you clamp long boards flat on the bench surface — ideal for face planing, sanding, and surface work. The vise closes toward the bench dog in the top, trapping the board between them across its full length.
Dog holes should be spaced 6 inches apart along the bench centerline. Round dogs (3/4-inch diameter) are the most common and are drilled with a standard Forstner bit. Square dogs, used in some European benches, grip slightly better but require a chisel or router to cut the mortises. If you plan to do any surface planing, a vise with a built-in dog hole and a bench top drilled to match is worth the extra setup time.
Racking Resistance — The Quality Indicator Nobody Talks About
Racking is the enemy of a precise grip. It happens when clamping force pushes the sliding jaw sideways or tilts it out of parallel — most noticeable when a workpiece is positioned to one side of the jaw rather than centered. A well-engineered vise resists racking through a combination of two parallel guide rods alongside the main screw, tight tolerances between the rods and the jaw casting, and a good distance between the two rods (wider spacing = better racking resistance).
To test any vise for racking resistance before buying, close the jaws lightly and try to move the sliding jaw side to side. Any perceptible play is a red flag. On quality vises (Yost, Wilton, Eclipse), the guide rods fit so precisely that there is no measurable play even with the screw disengaged.
Matching Vise Weight to Your Bench
A 20-pound cast-iron vise mounted to a flimsy bench is a problem that compounds itself: the vise provides excellent clamping force, but the bench flexes under load and that flex transfers directly back into the work. Before mounting any vise, ensure your benchtop is at least 1.5 to 2 inches thick, your bench legs are solidly mortised or bolted together with no perceptible wobble, and you’re mounting close enough to a bench leg that clamping forces travel into the leg structure rather than through a long span of benchtop.
How to Install a Bench Vise — Step-by-Step Guide
Installing a bench vise is a half-day project that most woodworkers can do themselves with basic tools. Done correctly, a properly mounted vise will feel like an extension of the bench — solid, immovable, and perfectly aligned. Done poorly, it flexes, racks, and is miserable to use no matter how expensive the vise itself is.
Before You Start — Placement
Right-handed woodworkers should mount a face vise at the left front corner of the bench; left-handers mount it on the right. This puts the vise close to the bench leg so clamping force goes directly into the structure, and keeps your dominant hand free to control planes and chisels. Check that the vise handle, when fully extended, won’t interfere with bench legs, drawers, or any tool storage mounted below the bench apron. Plan for the handle’s full sweep radius, not just its rest position.
Step 1 — Measure and Mark
Remove the sliding jaw and lead screw from the vise body if possible — the rear jaw alone is significantly easier to hold in position for marking. Place the rear jaw upside-down on the underside of the bench apron and slide it until it protrudes the correct amount beyond the bench front face. For a 7-inch vise, the jaw should project approximately 1/4 inch past the bench face; for a 10-inch vise, approximately 1/2 inch. This projection ensures the built-in bench dog sits at the correct height relative to the bench top dog holes. Mark all mounting hole locations with a sharp pencil or awl.
Step 2 — Prepare Spacer Blocks
Most vises require a hardwood spacer block between the casting and the bench surface to bring the jaw flush with or slightly below the bench top. Cut spacer blocks from a dense hardwood — maple and beech are ideal — and plane them for a snug, flat fit. If installing an end vise, use two spacer blocks positioned on either side of the bench dog housing to maintain clearance for the dog to travel.
Step 3 — Drill and Mount
Drill clearance holes at the marked positions using the appropriate bit size for your mounting hardware. Use a 1-inch Forstner bit for the lead screw clearance hole and a 3/4-inch Forstner for guide rod holes — measure your specific vise before drilling, as dimensions vary by model. Mount the vise using lag screws into solid wood or machine bolts with washers and nuts through the bench. Never rely on wood screws alone — they pull out under the torque loads a regularly used vise generates.
Tighten all bolts in a diagonal pattern (front-left, back-right, back-left, front-right) to prevent uneven stress on the casting. The vise should feel completely immovable when mounted — if there’s any flex, check for gaps between the spacer block and either mating surface and shim as needed.
Step 4 — Add Wooden Jaw Faces
Cut 3/4-inch hardwood faces for both the fixed rear jaw and the sliding front jaw. The faces should be the full width of the metal jaw and tall enough to cover the working surface. Countersink and bolt them to the jaw faces using the pre-drilled holes in the casting. Once attached, plane the wooden face flat and flush — use a straightedge across both faces with the vise closed to check alignment. Apply a finish (oil or wax) to the wooden faces to protect them from glue squeeze-out and moisture.
Step 5 — Drill Bench Dog Holes
To ensure dog holes are perfectly perpendicular to the bench surface, make a simple drilling guide: cut a 2-inch square block of hardwood and bore a 3/4-inch hole through its center using a drill press. Clamp this guide to the bench top, position it at your first dog hole location, and drill through it with a 3/4-inch brad-point bit. Space subsequent holes 6 inches apart along the bench centerline. Clean out any tear-out with a sharp chisel, and test your bench dog for smooth travel through each hole before calling the installation complete.
Troubleshooting Common Installation Issues
Vise misalignment (jaw face not flush with bench face): adjust with thin wood or card shims between the spacer block and bench apron, then re-tighten. Binding mechanism: disassemble, clean guide rods and screw threads with solvent, and re-lubricate with an appropriate grease (lithium grease works well). Loose jaws over time: check and re-tighten all lag screws — seasonal wood movement loosens even well-set fasteners; consider adding washers to spread the clamping load.
10 Bench Vise Mistakes to Avoid
Which Bench Vise Type Is Right for You?
| Your Situation | Recommended Type | Best Model |
|---|---|---|
| Buying your first vise; mixed tasks | Face / Front Vise | Yost M7WW |
| Budget is tight; occasional use | Face / Front Vise | Pony Jorgensen 27091 |
| Want to buy once, use forever | Face / Front Vise (Premium) | Wilton 78A |
| Primarily hand-tool woodworker | Face Vise (toe-in) or Leg Vise | Eclipse Quick-Release |
| Frequently work with boards wider than 6″ | Wide-jaw Face Vise | Yost M9WW |
| Dovetailing wide stock; large casework | Twin-Screw Vise | Veritas Twin-Screw |
| Lots of surface/face planing; own a face vise already | Add an End Vise | Veritas Twin-Screw (as end vise) |
| Complete beginner; very occasional use | Light-duty Face Vise | IRWIN 226361 |
Frequently Asked Questions
What size bench vise do I need for woodworking?
For most woodworking tasks, a 7-inch jaw is the sweet spot. It handles the majority of dimensional lumber, furniture components, and project pieces without consuming excess bench space. If you frequently work with boards wider than 6 inches on edge — table legs, wide rails, case sides — consider 9 inches. Very few woodworkers need anything larger than 9 inches for bench use.
What’s the difference between a face vise and a leg vise?
A face vise mounts to the front apron of the bench and is the most versatile and beginner-friendly type. A leg vise attaches directly to a bench leg and provides a much larger clamping area — ideal for wide boards and drawknife work — but requires more involved installation and is favored by dedicated hand-tool woodworkers. Start with a face vise; add a leg vise if and when your work demands it.
Can I use a machinist’s vise for woodworking?
Not safely without modification. The serrated steel jaws on a machinist’s vise will crush and dent wood fibers on contact. If you must use one in a mixed shop, clamp sacrificial wood pads over both jaw faces before touching any workpiece you care about. For serious woodworking, always use a vise designed for the purpose.
How do I install a bench vise?
See our detailed step-by-step installation guide above. The short version: position over a bench leg, mark holes, drill clearance holes with a Forstner bit, mount with lag screws or machine bolts (not wood screws), add hardwood jaw faces, and drill bench dog holes spaced 6 inches apart. Allow half a day for the full installation.
Do I need a quick-release bench vise?
If you build regularly — more than a few times a month — yes. The time saved on high-frequency clamping and unclamping across a woodworking session is meaningful, and once you’ve used quick-release it’s genuinely difficult to return to full-screw vises. For occasional hobbyists, a non-quick-release vise saves money and is perfectly acceptable.
How often should I lubricate my bench vise?
Lubricate the lead screw and guide rods at least once a year, or whenever the action feels stiff or gritty. Use a quality grease (lithium or white grease) on the screw threads and a light oil on the guide rods. Clean away old grease and metal dust before applying fresh lubricant. If you work in a dusty shop, lubricate more frequently — every six months is sensible.
What’s the best vise for dovetailing?
For most dovetailing tasks, any quality face vise with a toe-in jaw design (the Eclipse or Yost M7WW) works excellently. The jaw tilts the top of the workpiece toward you as you tighten, which keeps the piece from rocking under mallet blows. For dovetailing very wide drawer fronts and case sides where you need to grip the stock in the center of the jaw, the Veritas Twin-Screw is superior — its dual-screw design prevents racking regardless of where on the jaw the stock sits.
Final Verdict — Which Bench Vise Should You Buy?
After testing and evaluating all seven vises in real workshop conditions, the Yost M7WW is our top recommendation for most woodworkers. It covers the overwhelming majority of tasks — edge planing, dovetailing, routing, vertical sawing — with a smooth quick-release mechanism, racking-resistant toe-in jaw design, and solid cast-iron construction at a price that doesn’t require a budget conversation with yourself.
If your budget is tighter, the Pony Jorgensen 27091 is a genuinely capable vise that won’t let you down on most projects, especially with the wooden jaw liners that most vises in its class skip. If you’re ready to buy once and never buy again, the Wilton 78A is the correct choice — it will outlast you in the shop. For dedicated hand-tool woodworkers where every grip matters, the Eclipse Quick-Release is the professional’s choice, with its toe-in jaw and spring-loaded release setting it apart from everything else at its price.
Whatever vise you choose, remember the principle that matters most: a mid-range vise properly mounted to a solid bench outperforms an expensive vise poorly mounted every single time. Spend time on the installation, add good wooden jaw faces, position it over a bench leg, and lubricate it annually. Do those things and even a modest vise becomes a tool you reach for with confidence every session.
Check out our related ProtGuide articles on building a woodworking workbench, the best hand planes for beginners, and essential chisels for furniture making.


")


