Professional solar installation costs between $15,000 and $35,000 — and the bulk of that price tag is labor. A properly planned DIY solar install can save you $8,000–$15,000 in labor alone, with thousands more in long-term energy savings. But here’s what most guides won’t tell you: wrong or missing tools are the number-one reason DIY solar installs fail, get damaged, or become dangerous.
This is the most complete DIY solar tool checklist available in 2026. We’ve organized all 30 tools by installation phase — from planning and layout through roof mounting, electrical wiring, testing, and safety — with honest budget and pro-grade picks for each, real Amazon product recommendations, and a rent-vs-buy verdict so you don’t overspend on tools you’ll only use once.
Whether you’re installing a simple grid-tied rooftop system or a full off-grid battery setup, this guide covers every tool you’ll need, every critical mistake to avoid, and exactly how much your toolkit will cost before you buy a single panel.
Before You Start — Is DIY Solar Right for You?
DIY solar is genuinely achievable for most motivated homeowners — but be honest with yourself on these three questions before buying a single tool:
- Are you comfortable working on a pitched roof? If heights bother you or you’ve never done any roof work, a professional install is the safer choice.
- Can you wire a standard household outlet? Basic electrical competence is required. If you’ve never touched wiring, take a weekend course first.
- Do you have 2–3 free weekends? A 6–10 panel residential system typically takes 2–3 full days of work for an experienced DIYer — more for first-timers.
Most states also require a permit for solar installations, and your utility company will need to inspect the system before it’s connected to the grid. Check your local permit requirements before ordering equipment. Skipping the permit can void your homeowner’s insurance and prevent you from claiming the federal solar tax credit.
Tool Cost Overview — What Will This All Cost?
Here’s what you can realistically expect to spend on your DIY solar toolkit, depending on what you already own:
| Toolkit Level | What’s Included | Estimated Cost |
|---|---|---|
| Bare minimum (you already own basic hand tools) | MC4 crimper, safety harness, multimeter, UV sealant, cable ties | ~$150–$250 |
| Mid-range DIYer (some tools at home) | Above + cordless drill, torque wrench, fish tape, wire stripper | ~$400–$700 |
| Full pro toolkit (buying everything new) | All 30 tools, quality brands, including safety gear | ~$1,200–$1,800 |
Even at the high end, $1,800 in tools against $15,000 in labor savings is an obvious win — especially since most of these tools will serve you for decades beyond this single project.
The Complete 30-Tool Checklist at a Glance

Print this out and check off each tool before your install day. Nothing derails a project faster than driving to the hardware store mid-job because you forgot the fish tape.
| ✓ | Tool | Phase | Buy or Rent |
|---|---|---|---|
| ☐ | Tape Measure | Planning | Buy |
| ☐ | Chalk Line | Planning | Buy |
| ☐ | Torpedo / Digital Level | Planning | Buy |
| ☐ | Roof Pitch / Angle Finder | Planning | Buy |
| ☐ | Laser Level | Planning | Buy or Rent |
| ☐ | Cordless Drill / Driver | Mounting | Buy |
| ☐ | Torque Wrench | Mounting | Buy |
| ☐ | Socket Set (Deep Well) | Mounting | Buy |
| ☐ | Hole Saw Set | Mounting | Buy |
| ☐ | Flat Pry Bar | Mounting | Buy |
| ☐ | Caulking Gun + UV Sealant | Mounting | Buy |
| ☐ | Solar Panel Hanger | Mounting | Buy or Rent |
| ☐ | Metal Cutting Saw | Mounting | Buy or Rent |
| ☐ | MC4 Crimping Tool | Electrical | Buy |
| ☐ | Wire Stripper + Wire Cutter | Electrical | Buy |
| ☐ | Fish Tape (50 ft) | Electrical | Buy |
| ☐ | EMT Conduit Bender | Electrical | Rent |
| ☐ | Hydraulic Lug Crimper | Electrical | Rent |
| ☐ | Nut Drivers | Electrical | Buy |
| ☐ | UV-Resistant Cable Ties + Clips | Electrical | Buy |
| ☐ | Digital Multimeter | Testing | Buy |
| ☐ | PV Tester / Solar Panel Analyzer | Testing | Rent |
| ☐ | Clamp Meter (DC) | Testing | Buy or Rent |
| ☐ | Infrared Thermometer | Testing | Buy |
| ☐ | Fall Arrest Harness + Roof Anchor | Safety | Buy |
| ☐ | Extension Ladder (Type IA) | Safety | Rent or Borrow |
| ☐ | Rubber Insulating Gloves | Safety | Buy |
| ☐ | Safety Glasses (ANSI Z87.1) | Safety | Buy |
| ☐ | Hard Hat | Safety | Buy |
| ☐ | Non-Slip Steel-Toe Boots | Safety | Buy |
Phase 1 — Planning & Layout Tools (5 Tools)
Getting your panel layout right before you drill a single lag bolt saves hours of rework and prevents permanent roof damage. These five tools are what professionals use to plan an accurate, code-compliant array layout.
1. Tape Measure
A tape measure is so obvious it almost goes without saying — but the length and quality matters more than most people realize. A 16-foot tape requires multiple repositions across a full roof span, introducing cumulative measurement error that can throw your rail spacing off by half an inch or more.

- Pro Pick: Stanley FatMax 25 ft Tape Measure — wide blade, auto-lock, won’t buckle at full extension
- Budget Pick: Any 25 ft tape with a reinforced blade — avoid anything shorter
- Pro Tip: Get a minimum of 25 feet. Shorter tapes require too many repositions across a full roof, adding measurement error that compounds over 10+ panels.
2. Chalk Line
Chalk lines let you snap perfectly straight reference lines across your entire roof in seconds — essential for aligning rail mounts before you drill. Eyeballing panel rows leads to visibly crooked arrays that are obvious from the street and a headache to fix after the fact.

- Pro Pick: Irwin Tools STRAIT-LINE Chalk Line — fast-rewind gear, wide chalk capacity
- Pro Tip: Use blue chalk, not red. Red chalk is permanent and will stain your shingles. Blue washes off with rain.
3. Torpedo / Digital Level
You’ll use a level constantly during racking installation to verify that horizontal rails are true before tightening. A traditional bubble torpedo level works fine; a digital level with a numerical angle readout is faster and eliminates guesswork when you need to match an existing tilt.

- Pro Pick: Bosch GIM60L Digital Level — displays angle in degrees, magnetic base for hands-free use on metal rails
- Budget Pick: Stanley 9″ Torpedo Level — simple, accurate, and under $10
4. Roof Pitch / Angle Finder
Your panel tilt angle directly affects energy production. A system installed at the wrong angle can lose 10–25% of its annual output compared to optimal tilt for your latitude. Before you finalize your racking design, you need to know your exact roof pitch.

- Pro Pick: Empire Level Magnetic Angle Finder — reads pitch in degrees and rise/run; magnetic base sticks to metal racking while you record measurements
- Pro Tip: Your optimal tilt angle is roughly equal to your latitude in degrees. For most of the continental U.S., that’s 30–45°. If your roof is close, great. If it’s way off, consider an adjustable ground mount instead.
5. Laser Level
A self-leveling laser level projects a perfectly horizontal line across your entire roof in one shot — saving 30–45 minutes compared to snapping multiple chalk lines or using string lines. For large arrays of 10 or more panels, it’s a genuine time-saver.

- Pro Pick: Bosch GLL 55 Self-Leveling Cross-Line Laser Level — projects both horizontal and vertical lines, self-levels in 4°, 165-foot range
- Rent or Buy: If you own other property or do regular DIY projects, buy it. For a one-time install on a small system, renting from Home Depot for ~$30/day makes more sense.
Phase 2 — Roof Work & Mounting Tools (8 Tools)
Mounting is where the physical work happens — lag bolting rail mounts through your roof decking, cutting rails to length, lifting panels, and sealing every penetration against water intrusion. These eight tools cover everything you need to do it right.
6. Cordless Drill / Driver
Every competitor guide says “get a cordless drill” and stops there. Here’s what they miss: do NOT use an impact driver to tighten solar panel module clamps. Impact drivers deliver high rotational impacts that can crack tempered panel glass and strip aluminum racking threads. Use a regular drill with adjustable torque settings for all module clamp work. Save your impact driver for driving lag bolts into the roof decking where that power is welcome.
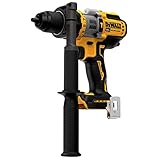
- Pro Pick: DeWalt DCD999B 20V MAX Brushless High Torque Drill — adjustable torque collar, compatible with all DeWalt 20V batteries, brushless motor for longer run time on the roof
- Budget Pick: Ryobi PCL206K2 — two-speed, 24-position clutch, two batteries included; adequate for a single install
- Battery warning: Charge an extra battery the night before. Cold morning temperatures on a roof will reduce run time by 20–30%. Running out of battery mid-installation, 25 feet up, is not a good situation.
7. Torque Wrench
Under-torqued racking clamps vibrate loose over years of thermal expansion and high winds. Over-torqued clamps crack aluminum rails or strip threads, potentially compromising the structural integrity of the entire array. Most solar racking manufacturers specify 15–18 ft-lbs for mid and end clamps — always confirm against your specific racking spec sheet.

- Pro Pick: CDI Torque 3/8″ Drive Adjustable Torque Wrench — 5–75 ft-lb range, click-type, American-made
- Budget Pick: LEXIVON 1/2″ Click Torque Wrench — accurate within ±4%, fine for residential solar
8. Socket Set (Deep Well)
Most racking bolt heads sit recessed inside aluminum extrusion channels — standard-depth sockets won’t reach. You specifically need deep well sockets for this job. A standard socket set from your garage drawer will leave you frustrated and reaching for a pair of pliers, which is not how you want to be tightening structural fasteners on a rooftop.

- Pro Pick: DeWalt DWMT73801 168-Piece Mechanic’s Tool Set — includes deep well sockets in both SAE and metric, ratchets, and extensions; covers every bolt you’ll encounter in a solar install and every car repair after
- Key sizes for solar racking: 3/8″, 7/16″, 1/2″, and 9/16″ deep well sockets cover 95% of racking hardware
9. Hole Saw Set
Clean conduit penetrations through your roof decking require a proper hole saw — a standard drill bit leaves a ragged, oversized hole that is nearly impossible to seal properly against water intrusion. No competitor guide mentions this tool, but anyone who has tried to caulk around a jagged drill bit hole in a shingle knows why it matters.
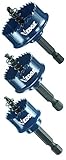
- Pro Pick: Bosch HBT2587B 25-Piece Hole Saw Set — covers 3/4″ through 4″ diameters; the 1-1/4″ and 1-1/2″ saws handle standard 3/4″ and 1″ EMT conduit penetrations
- Pro Tip: Drill conduit holes at a slight downward angle (5–10°) from inside to outside. This prevents water from running down the conduit into the hole during heavy rain.
10. Flat Pry Bar
You’ll need to carefully lift shingles to slide flashing plates underneath without cracking them. A flat pry bar gives you the controlled leverage to lift shingles cleanly — using a screwdriver or hammer claw risks cracking shingles and creating exactly the roof damage you’re trying to avoid.

- Pro Pick: Stanley FatMax Pry Bar — flat profile slides easily under shingles without damage
- Pro Tip: Work in the morning or on overcast days when possible — asphalt shingles become more flexible and crack-resistant in cooler temperatures.
11. Caulking Gun + UV-Rated Sealant
Every roof penetration needs to be sealed, and here is where most DIY guides fail you: standard silicone caulk degrades in 2–3 years under UV exposure. By year three, that “sealed” lag bolt penetration is a slow roof leak. You must use a UV-rated polyurethane sealant — not hardware store silicone — for any penetration that will be exposed to sunlight.

- Pro Pick caulking gun: Newborn 930-GTD Drip-Free Caulking Gun — smooth rod, dripless retraction, handles full-size tubes
- Sealant Pick: Sika NP1 Polyurethane Sealant — UV-stable, paintable, 50-year life expectancy; used by commercial roofing contractors
- Do NOT use: Regular silicone, latex, or any sealant not labeled UV-resistant for outdoor roof use
12. Solar Panel Hanger
A 60-cell solar panel weighs 40–50 lbs and is about 65″ × 40″ — essentially a large, wind-catching sail. Trying to hold one in position on a sloped roof while simultaneously driving module clamp bolts is genuinely dangerous and usually requires a second person. A panel hanger hooks over your rail and holds the panel at the correct position while you work, effectively turning a mandatory two-person job into a manageable solo task.
- Pro Pick: Solar Panel Roof Positioning Hanger Tool — search “solar panel hanger tool” on Amazon for current top-rated options
- Rent or Buy: If installing a large array (12+ panels) across multiple weekends, buy one. For a quick small install with a helper available, skip it.
13. Metal Cutting Saw (For Rails)
Your aluminum mounting rails almost certainly need to be cut to length on-site. Here is a critical detail that every competitor guide misses: standard wood-cutting saw blades will shred aluminum rails. You need a saw with a non-ferrous metal blade — fine-tooth, 80-tooth or higher — specifically rated for aluminum cutting.
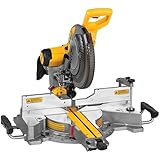
- Pro Pick: DeWalt DWS779 12″ Miter Saw paired with a Freud 80T Non-Ferrous Metal Blade
- Rent or Buy: Rent the miter saw if you don’t own one (~$40/day at Home Depot). Buy the non-ferrous blade — it’s ~$30 and it won’t destroy your racking. A circular saw with a metal-cutting blade also works if you already own one.
- Safety note: Always clamp aluminum rails before cutting — aluminum grabs saw blades and can kick rails back violently if they shift during the cut.
Phase 3 — Electrical Wiring Tools (7 Tools)
The electrical phase is where DIY solar installs most commonly go wrong. Loose connections, wrong wire sizes, or improperly crimped connectors are not just performance problems — they are fire hazards. Invest in the right tools here; there is no place to cut corners.
14. MC4 Crimping Tool ⭐
MC4 connectors are the waterproof push-lock connectors used on virtually every solar panel made in the last 15 years. They are the single most important connection point in your entire system — and they require a specific crimping tool to install correctly. Using regular pliers to crimp MC4 pins creates a connection that looks fine but has high contact resistance, causing power loss, heat buildup, and in worst cases, arc faults and fires.
Here’s how the MC4 crimp works: you strip approximately 5/16″ of insulation from your PV wire, insert the bare conductor into the metal pin, place the pin in the MC4 crimping tool’s correct die, and compress with firm, even pressure until the tool clicks or bottoms out. The finished crimp should show a uniform indent around the full circumference of the pin — not a single flat impression. Then slide the pin into the MC4 body until it clicks. Pull back firmly to confirm it’s locked. Do a test: a correctly locked MC4 connector should take 20–30 lbs of pull force to separate. If it pulls apart easily, redo the crimp.

- Pro Pick: HAISSTRONICA MC4 Solar Connector Crimping Tool Kit — includes the crimping tool, wire stripper sized for PV wire, and a pack of MC4 connectors; everything you need in one kit
- Budget Pick: Baomain MC4 Crimper — works, but check reviews for your specific panel wire gauge (10 AWG or 12 AWG)
- Pro Tip: Buy a 10-pack of spare MC4 connectors. You will ruin at least 2–3 learning the correct technique. A bag of spares is cheap insurance — mangled connectors cannot be reused.
- Rent or Buy: Buy — it costs $20–$40, you cannot improvise or substitute it, and you need it for every future panel addition or replacement.
15. Wire Stripper + Wire Cutter
You’ll need two stripping and cutting tools, not one. PV wire (10 AWG or 12 AWG) runs from your panels to your combiner or inverter and requires a precision auto-stripper that won’t nick the conductor. Battery bank cables (4 AWG to 2/0 AWG for off-grid systems) are far too heavy for a standard stripper — they need dedicated heavy cable cutters.

- Pro Pick (PV wire): Klein Tools 11057 Auto Wire Stripper — self-adjusting, works 10–20 AWG without any setting changes
- Heavy cable cutter: Klein Tools 63050 Cable Cutter — cuts through 2/0 AWG cleanly; a hacksaw leaves frayed ends that won’t seat in lugs correctly
16. Fish Tape (50 ft)
Fish tape is how you pull wires through conduit runs — especially through the bends and offsets that are common when routing from roof penetrations down to your inverter. Without fish tape, pulling wire through any run longer than 10–15 feet becomes a frustrating, two-person struggle.

- Pro Pick: Klein Tools 56005 50 ft Steel Fish Tape — smooth-rewind case, stiff enough to push through bends, lightweight enough to carry on a roof
- Rent or Buy: Buy — at $30–$40, it’s inexpensive, it’s useful for every future electrical project in your home, and it’s the kind of tool you’ll reach for repeatedly.
17. EMT Conduit Bender
Most residential solar installs require at least one or two custom conduit bends — a 90° kick to go from horizontal to vertical at your roof penetration, or an offset to clear a ridge cap. A conduit bender makes these bends precise and professional-looking. Trying to bend conduit by hand creates kinks that restrict wire pulling and look amateurish on your final inspection.

- Pro Pick: Klein Tools 51605 1/2″ EMT Conduit Bender — most solar installs use 3/4″ or 1″ EMT; confirm your conduit size before ordering
- Rent or Buy: Rent — you’ll use it for 2–3 bends over one weekend, then probably never again. ~$25/day at most tool rental shops.
- Pro Tip: A speed square is a surprisingly useful angle guide when making bends — hook it to the conduit and use the degree markings to hit your exact angle.
18. Hydraulic Lug Crimper (Battery Cable)
This tool is almost universally ignored by solar guides, and that’s a safety problem. If you’re building an off-grid system with a battery bank, you’ll be terminating large-gauge cables (4 AWG through 2/0 AWG) with copper lug terminals. Crimping these with regular pliers creates high-resistance connections that generate heat, degrade the connection over time, and can eventually cause insulation melting or fire. A hydraulic lug crimper applies hundreds of pounds of uniform force around the full circumference of the lug — the only correct way to terminate these cables.

- Pro Pick: TEMCo Hydraulic Cable Lug Crimper HC0100 — handles 10 AWG through 600 MCM, includes die set, professional-grade
- Rent or Buy: Rent if you can — this tool costs $150+ new and you’ll use it for a few dozen crimps. Many electrical supply shops rent them by the day.
- Grid-tied systems: If you’re doing a grid-tied system with no battery bank, you likely won’t need this. Skip it.
19. Nut Drivers
Solar electrical boxes, disconnect switches, and subpanel knockouts use machine screws that need nut drivers — not pliers. Most PV electrical hardware uses 7/16″ and 1/2″ nut drivers specifically. A full set covers you regardless of what your specific equipment requires.
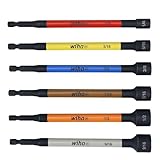
- Pro Pick: Wiha 6-Piece Nut Driver Set — magnetic tips, cushion-grip handles, sizes 3/16″ through 1/2″ cover every solar electrical box fastener you’ll encounter
20. UV-Resistant Cable Ties + Mounting Clips
Your wiring will be exposed to direct sunlight on the back of your panels for 25+ years. Standard white or natural nylon cable ties turn brittle and snap in UV exposure within 2–3 years. UV-degraded cable ties mean sagging, chafing wire that can abrade through its insulation against the panel frame — a ground fault waiting to happen. Always use UV-stabilized black nylon cable ties for any outdoor wiring.

- Pro Pick: Panduit PLT2S-C0 UV Black Cable Ties — UV-stabilized, 50 lb tensile strength, rated for 25+ years outdoor exposure
- Also buy: Solar panel wire management clips — these clip-on wire holders attach to your rail and hold PV wire runs neatly against the frame, preventing the wire sag that leads to chafing
Phase 4 — Testing & Commissioning Tools (4 Tools)
These are the tools that catch problems before your system is energized — when fixing them is straightforward — versus months later when you’re troubleshooting a performance mystery or, worse, a ground fault. Most DIYers skip or shortcut this phase. Don’t.
21. Digital Multimeter ⭐
A multimeter is your primary diagnostic tool throughout the entire install — testing for continuity before you close junction boxes, confirming voltage polarity before connecting strings, and verifying inverter input voltage after commissioning. For solar work specifically, your meter must be CAT III rated at minimum — this tells you the meter is designed to withstand the voltage spikes common in solar PV circuits without failing dangerously.

- Pro Pick: Fluke 117 Electrician’s True RMS Multimeter — CAT III 600V rated, true RMS, auto-ranging; the meter professional solar installers actually use
- Budget Pick: AstroAI AM33D Digital Multimeter — CAT III rated, adequate for a single DIY install at a fraction of the price
- Safety reminder: Solar panels generate live DC voltage in any daylight. Always test your meter on a known source before relying on it for safety-critical measurements. A failing meter that gives false zero readings is dangerous.
22. PV Tester / Solar Panel Analyzer
This is the biggest testing tool gap across all competing guides — zero mention it. A PV tester measures each individual panel’s open-circuit voltage (Voc), short-circuit current (Isc), and maximum power output, then compares them against the panel’s rated specifications. This lets you identify factory-defective panels, shading issues, or installation damage before the system is commissioned — when getting warranty replacements is straightforward.
Without a PV tester, a panel producing 15% below rated output could go undetected for months or years until you notice your electricity bill hasn’t dropped as much as expected. Then you’re troubleshooting a fully installed, wired system to find the problem.
- Pro Pick: Risepro Solar Panel Tester — displays Voc, Isc, and peak power; straightforward to use without professional training
- Rent or Buy: Rent — professional-grade PV analyzers cost $300–$1,500+. Many solar supply companies rent basic models by the day. For a residential install, a one-day rental is all you need.
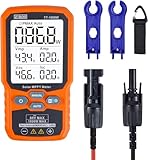
23. Clamp Meter (DC)
A clamp meter measures live current in a wire by clamping around it — without breaking the circuit or touching any energized conductors. For solar, you specifically need one rated for DC current measurement — not all clamp meters measure DC. This tool lets you verify that each string of panels is producing its expected current at operating conditions, which confirms your wiring is correct and your panels are performing.

- Pro Pick: Fluke 376 FC True-RMS AC/DC Clamp Meter — measures both AC and DC current, wireless logging via Fluke Connect app, 1000A range
- Budget Pick: Search “DC clamp meter solar” for lower-cost options — confirm the listing specifically says DC current measurement, not just AC
24. Infrared Thermometer
After your system powers up for the first time, scan every electrical connection and junction box with an infrared thermometer. Hot spots indicate loose connections, undersized wire, or high-resistance crimps that will fail prematurely and may create fire risk. A connection that reads 10°F or more above ambient temperature under load needs to be re-examined and corrected. This is your last safety check before signing off on the install.

- Pro Pick: Etekcity Lasergrip 800 Infrared Thermometer — -58°F to 1,382°F range, laser targeting, fast response; more than adequate for solar commissioning at a very low price
- Pro Tip: Take temperature readings under full-sun conditions with the system running at normal load. Readings taken in the shade or at low irradiance won’t reveal marginal connections.
Phase 5 — Safety Equipment (6 Items)
Falls from roofs kill approximately 100 workers per year in the United States — and they are disproportionately DIYers who underestimated the risk. Solar installations involve multiple trips up and down a sloped roof surface while carrying heavy, awkward panels and tools. None of the safety items below are optional.
25. Fall Arrest Harness + Roof Anchor
A fall arrest harness is not the same as a positioning lanyard or a general “safety harness.” For working on sloped roofs, you need a complete fall arrest system: a roof anchor that bolts to the decking, a self-retracting lifeline or shock-absorbing lanyard, and a full-body harness rated to ANSI Z359. Together, these limit your fall to a few feet before arresting — a fall from 20 feet without arrest equipment is frequently fatal.

- Roof Anchor: Guardian Fall Protection 11250 Roof Anchor — temporary roof anchor for asphalt shingles, OSHA compliant, installs with nails through decking
- Harness: DBI-SALA ExoFit NEX Full Body Harness — ANSI Z359 certified, padded shoulder and leg straps, work positioning D-ring on back
- Never substitute: A climbing harness, construction belt, or rope tied around your waist does not constitute fall arrest equipment and will not protect you in a fall.
26. Extension Ladder (Type IA)
This is another area where competitor guides are dangerously vague — all they say is “get a ladder.” Here’s what they don’t tell you: the household ladder in your garage is almost certainly a Type III ladder rated for 200 lbs. When you add your body weight, tool belt, solar panel, and climbing fatigue, a Type III ladder can be overloaded before you reach the roof. For any roof work where you’re carrying tools and equipment, you need Type IA (300 lb rating) minimum.

- Pro Pick: Werner D1528-2 28 ft Fiberglass Extension Ladder — Type IA, 300 lb rated, fiberglass (non-conductive, critical for electrical work), slip-resistant feet
- Rent or Buy: Extension ladders are expensive ($300–$600) and bulky to store. If you don’t already own a proper ladder, renting for the weekend (~$40–$60/day at Home Depot) makes strong financial sense.
27. Rubber Insulating Gloves
This is the most dangerous gap in every competing guide. They all say “wear work gloves.” Work gloves provide zero electrical insulation. Solar panels generate live DC voltage whenever light hits them — including on cloudy days and even indoors near windows. You cannot turn a solar panel off. Standard leather or synthetic work gloves will not protect you from an electrical shock while handling live panel connectors.
Rubber insulating gloves are specifically designed to prevent electrical current from passing through them. For solar PV work, Class 00 (rated to 500V DC) or Class 0 (rated to 1,000V DC) gloves are appropriate for most residential systems. Wear them any time you’re handling MC4 connectors, working near live panel terminals, or working in the combiner box before the system is isolated.

- Pro Pick: Salisbury E114B Class 00 Rubber Insulating Gloves — 500V rated, ASTM D120 tested, lightweight enough for dexterous work
- Pro Tip: Wear leather over-gloves on top of your insulating gloves when working on the roof — insulating rubber is vulnerable to punctures from nails and sharp metal edges.
28. Safety Glasses (ANSI Z87.1)
Cutting aluminum rails throws sharp metal shavings. Drilling into roof decking sends wood chips backward. Installing lag bolts with an impact driver kicks up debris. Any of these can cause permanent eye damage in a fraction of a second. ANSI Z87.1 rated safety glasses are the minimum standard — this is the rating that certifies the lens can withstand high-velocity impact without shattering.
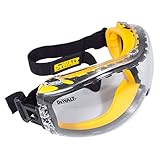
- Pro Pick: DeWalt DPG82-11C Concealer Anti-Fog Safety Glasses — ANSI Z87.1 rated, wraparound frame, anti-fog coating for working in heat
29. Hard Hat
When working on a roof with a second person, tools and hardware get dropped. A 3/8″ bolt falling 15 feet strikes with the force of a punch. A hard hat is light, cheap, and takes zero effort to put on — there’s no logical reason to skip it on a multi-person roof installation.

- Pro Pick: MSA V-Gard Full-Brim Hard Hat — ANSI/ISEA Z89.1 Class E rated, full brim deflects falling debris away from your face and neck, ratchet suspension fits over a baseball cap
30. Non-Slip Steel-Toe Boots
A solar panel is a smooth, rigid surface on a sloped roof — a nearly ideal surface for a slip-and-fall. Your footwear choice directly determines your grip on the roof. Work boots with aggressive rubber lug soles give you the traction to work confidently on a pitch up to about 6:12. Above that, supplemental roof jacks are recommended regardless of footwear. Steel-toe protection matters if you’re carrying or sliding 50-lb panels.

- Pro Pick: Timberland PRO Titan 6″ Steel-Toe Work Boot — anti-fatigue footbed for long days on your feet, non-slip rubber outsole, ASTM F2413 safety rated
Rent vs. Buy — The Complete Decision Table
Not every tool on this list deserves a permanent spot in your garage. Here’s an honest verdict on what to buy, what to rent, and the reasoning behind each decision:
| Tool | Verdict | Reason |
|---|---|---|
| Fall arrest harness | BUY | Safety-critical; never compromise with a rental of unknown condition |
| Cordless drill | BUY | Used constantly in every home DIY project for decades |
| MC4 crimping tool | BUY | $20–$40 — can’t improvise this; essential for any future panel work |
| Torque wrench | BUY | Precision tool; inexpensive to own; useful for car maintenance too |
| Digital multimeter | BUY | Essential for any electrical work in your home forever |
| Fish tape | BUY | Inexpensive; useful for every future electrical project |
| UV cable ties | BUY | Consumable; under $15 for a box of 100 |
| UV sealant | BUY | Consumable; needed in full during install |
| Infrared thermometer | BUY | Inexpensive; useful for HVAC, insulation checks, cooking |
| Extension ladder | RENT or BORROW | Expensive and bulky; ~$40–$60/day to rent |
| Conduit bender | RENT | ~$25/day; you’ll make 1–3 bends and never use it again |
| Hydraulic lug crimper | RENT | $150+ to buy; single-use for most off-grid installs |
| PV panel tester | RENT | Professional tool costing $300–$1,500+; one-day rental covers your needs |
| DC clamp meter | BUY or RENT | Buy the budget version if cost-sensitive; rent a Fluke if you want the best |
| Metal cutting miter saw | RENT | Unless you already own one; ~$40/day rental vs. $400+ to buy |
| Laser level | BUY or RENT | Buy if you’ll use it again for fencing, decking, or tile; otherwise rent |
Ground Mount vs. Roof Mount — Extra Tools Needed
No competitor guide addresses this at all — but the tool list for a ground mount system is meaningfully different from a roof mount. If you’re installing a ground-mounted array, here’s what you’ll need in addition to the core list:
Ground Mount Extra Tools
- Post hole digger or power auger — for digging concrete footings for your mounting posts (typically 18″–36″ deep depending on frost depth and soil type)
- Concrete mixer or buckets — post footings are typically 2–4 bags of concrete per post; a power mixer is faster but not essential for small systems
- Conduit for underground wire burial — most codes require wiring from a ground mount to the house to be run in conduit buried 18″–24″ deep; you’ll need a trenching shovel or rented trencher
- 4-ft level — for verifying posts are plumb in all directions before the concrete sets; errors at this stage are permanent and expensive to correct
- Post level — clips over a post and shows level in two axes simultaneously, freeing your hands while you brace or backfill
Roof Mount Extra Tools
- Solar panel hanger — essential for solo installs on sloped roofs
- Flat pry bar — for lifting shingles to install flashing
- UV polyurethane sealant — mandatory for all roof penetrations
- Hole saw set — for clean conduit penetrations through roof decking
- Roofing nails and spare shingles — not a tool, but smart to have for repairing any cracked shingles during installation
Off-Grid vs. Grid-Tied — Tool Differences
Off-grid and grid-tied systems share most of the same tooling, but the battery bank component of an off-grid install adds specific requirements that no competitor mentions:
Off-Grid Additional Tools
- Hydraulic lug crimper — mandatory for large battery cables (4 AWG–2/0 AWG); cannot be improvised safely
- Battery terminal cleaner (wire brush set) — for cleaning lead-acid battery terminals before connection; oxidized terminals cause high resistance and sulfation
- Hydrometer — for flooded lead-acid batteries only; measures specific gravity of electrolyte to assess cell health and state of charge
- Cell-level battery tester — for used or reconditioned lithium battery cells; verifies each cell is within specification before assembly
Grid-Tied Additional Tools
- Lockout/tagout kit — when working near your main service panel during grid-tie connection, a lockout kit lets you physically lock the main breaker in the off position, preventing accidental re-energization by someone inside the house while you work outside
5 Costly Mistakes from Using the Wrong Tools
Each of these is a real, documented failure mode — not hypothetical. Learn from other people’s expensive mistakes before making your own.
Mistake #1: Using an Impact Driver to Tighten Module Clamps
Impact drivers deliver sudden rotational impacts — perfect for driving lag bolts, disastrous for aluminum solar racking. The impact torque spikes well beyond what the racking manufacturer specifies, stripping aluminum threads or worse, cracking the tempered glass of the panel at the clamping point. Cracked panels are not covered under manufacturer warranty when caused by improper installation. Cost of this mistake: $200–$400 per damaged panel, plus your time to remove, replace, and re-wire it. Use a drill with adjustable torque for all module clamp work.
Mistake #2: Using Pliers Instead of an MC4 Crimper
Plier-crimped MC4 pins create a flat crimp that looks acceptable but leaves gaps in the conductor contact area. This creates resistance — and resistance in a DC circuit creates heat. Over months and years, that heat oxidizes the contact, increases resistance further, generates more heat, and eventually you have a glowing-hot connector that melts the plastic MC4 housing and potentially arcs to adjacent wiring. This is a documented cause of solar system fires. An MC4 crimping tool costs $25. A house fire costs everything.
Mistake #3: Sealing Roof Penetrations with Standard Silicone
Standard silicone degrades rapidly under UV exposure, typically cracking and pulling away from the penetration within 2–3 years. The result is a slow roof leak that may not become visible inside your home for another year after that — by which point the damage to your decking, insulation, and interior ceiling is substantial. Only UV-rated polyurethane sealant is appropriate for solar roof penetrations. It costs about $10–$15 more per tube. It’s not optional.
Mistake #4: Using Standard Nylon Cable Ties on PV Wire Runs
White or natural nylon cable ties are not UV stabilized. Under direct sunlight on the back of your panels, they become brittle within 2–3 years and snap. Broken cable ties mean sagging wire — and sagging wire abrades against the sharp aluminum edges of your racking and panel frames. Abraded insulation on a PV wire causes a ground fault. Always use UV-stabilized black nylon cable ties for any outdoor wiring, and always route wires away from sharp edges even when properly secured.
Mistake #5: Skipping PV Testing Before Commissioning
Panels can leave the factory producing meaningfully below rated output due to cell defects, shipping damage, or delamination — and look perfectly fine on the roof. Without a PV tester at commissioning, this problem will not be discovered until months later when your electricity bill isn’t dropping as expected. By that point, you’ve already closed up all your junction boxes, and troubleshooting a fully installed system is time-consuming and frustrating. A single day’s rental of a PV tester lets you verify every panel individually before the system goes live, while you still have all your tools on site and the install is fresh in your mind.
Frequently Asked Questions
What tools do I need to install solar panels myself?
For a complete DIY solar installation, you’ll need tools across five categories: planning and layout (tape measure, chalk line, level, angle finder), roof mounting (drill, torque wrench, deep well socket set, hole saw, pry bar, UV sealant, saw), electrical wiring (MC4 crimper, wire stripper, fish tape, conduit bender), testing (multimeter, PV tester, clamp meter, infrared thermometer), and safety equipment (fall harness, Type IA ladder, insulating gloves, safety glasses, hard hat, steel-toe boots). The full list is 30 tools — see the checklist table above for the complete breakdown.
Can I install solar panels with just basic hand tools?
Not safely or effectively. Some power tools — particularly a drill and a torque wrench — are essential to doing the job correctly. More critically, specialized tools like an MC4 crimping tool cannot be substituted with standard hand tools without creating a safety hazard. You can rent expensive or rarely-used tools like a miter saw, conduit bender, and PV tester, which significantly reduces your upfront cost while still giving you the right equipment for each task.
What is an MC4 crimping tool and do I really need one?
MC4 connectors are the waterproof push-lock connectors used to join solar panel wiring. The MC4 crimping tool presses a metal pin onto the wire conductor with a precise, uniform crimp that creates a low-resistance, weatherproof connection. Without it, there is no safe way to install MC4 connectors — attempting to crimp with pliers creates high-resistance connections that generate heat and present a fire risk. Yes, you absolutely need one. The good news is they cost $20–$40 and many kits include a wire stripper and spare connectors.
How much does it cost to buy all the tools for DIY solar?
If you already own basic tools like a cordless drill, ladder, and hand tools, budget $150–$250 for the specialized items you’ll need to buy (MC4 crimper, safety harness, multimeter, UV sealant). A mid-range DIYer starting with fewer tools should budget $400–$700. Buying everything new and quality runs $1,200–$1,800 — but that’s still a fraction of the $8,000–$15,000 in labor you’re saving, and most of these tools will serve you for 20+ years of home maintenance projects.
Can I use an impact driver for solar panel clamps?
No. Impact drivers should not be used to tighten solar panel module clamps or racking fasteners. The high-torque impacts they deliver far exceed the manufacturer-specified torque values for aluminum racking hardware, which can strip threads, crack panel glass, or damage the structural integrity of your array. Use a regular drill with an adjustable torque collar for all module clamp work. Reserve the impact driver for driving lag bolts into roof rafters, where its power is appropriate.
What safety equipment is required for roof solar installation?
At minimum: an ANSI Z359-certified fall arrest harness and roof anchor system, a Type IA extension ladder, rubber insulating gloves (Class 00 or Class 0) rated for the voltage of your system, ANSI Z87.1 safety glasses, a hard hat, and non-slip steel-toe boots. None of these are optional. Falls from roofs are the leading cause of fatal construction injuries, and solar panels generate live voltage in any daylight that cannot be switched off.
Do I need a permit to install solar panels myself?
In most U.S. states, yes. A building permit and electrical permit are typically required for any solar installation, and your utility will need to inspect and approve the system before it can be grid-tied. Skipping permits can void your homeowner’s insurance, prevent you from claiming the federal solar tax credit, and create problems when selling your home. Check your local building department requirements before ordering any equipment.
How long does a DIY solar installation take?
A typical 6–10 panel grid-tied rooftop system takes most DIYers 2–3 full days of work. First-timers should plan for a full long weekend. Off-grid systems with battery banks add another day or two for wiring the battery and charge controller. Planning your layout and pulling permits in advance (typically 2–4 weeks) means you can do the physical installation over a single weekend once your equipment is on hand.